Frequently asked questions
1. General
Pantas is a free cloud-based e-invoicing platform that streamlines your billing, invoicing and payment process. No more drafting invoices in excel or accounting systems, converting them to PDF and emailing them - Pantas does this for you! Think about all those times you have spent correcting error-ridden invoices, chasing after late payments due to missing invoices or worst yet - the times you have overpaid invoices due to duplicates.
Pantas will also provide your business seamless access to financing - via our partner banks. By using our AI-powered algorithms, we will be able to better assist your business in securing financing at a reasonable cost.
If your business sends and/or receives more than 5 invoices a month, Pantas is for you!
By taking a digital approach to existing traditional workflows currently practiced, Pantas can drastically reduce time & cost inefficiencies – Giving you more time and resources to focus on improving your business.
Pantas is also for you if you are experiencing difficulty in securing financing to sustain or grow your business. At Pantas, we aim to democratize the access to credit - so that every business has a fair chance to obtain adequate financing at an affordable rate.
Yes you can! Please navigate to FAQ section 3.1 under Companies to learn how Pantas supports businesses without a business registration number.
Yes you can! During the demo session, we will be able to share with you in detail - how Pantas works, how it helps your business become more efficient and how to best fit Pantas into your existing workflow for maximum benefits.
Schedule a demo session with our team.
No, you do not. Pantas (which is focused on billing, invoicing and the payment process) serves as an add-on to your existing software/systems. We simplify your manual work of managing/receiving and issuing paper or PDF invoices.
Our simple import/export integration feature is compatible with any files in the XLSX, XLS and CSV format. These are the most common file formats that are currently being utilised by existing accounting software and ERP systems.
Pantas can be a game-changer for you as:
i. Pantas is totally free
ii. Has an extensive and easy-to-use dashboard that efficiently tracks your account payables and receivables - You will be able to manage your finance workflow at your fingertips
iii. Auto fills your invoices based on historical data which avoids repetitive work
iv. Has a powerful search engine which allows you to instantly locate specific invoices
v. Pantas assists your business in securing affordable financing
No, you do not. You can access Pantas anytime and anywhere as it is built in the cloud on a web-based framework. Once you have signed up, you can access it from any device using your Pantas account.
On average, it takes a new user less than 3 minutes to fully register on Pantas.
To get the most out of your Pantas experience, we recommend both buyers and sellers to be on Pantas. This will enable the best user experience whereby both sides will enjoy seamless billing, invoicing and payment. On top of that, less data entry is required, and reconciling payments couldn't be easier!
However, we do understand that not all your sellers/suppliers or buyers/customers will be on Pantas. Here at Pantas, we cater to our users' needs and have developed features to capture the above flow.
For buyers looking to record a payable/bill from a seller/supplier who is not on Pantas, you will be able to do so with our "Record a Bill" feature.
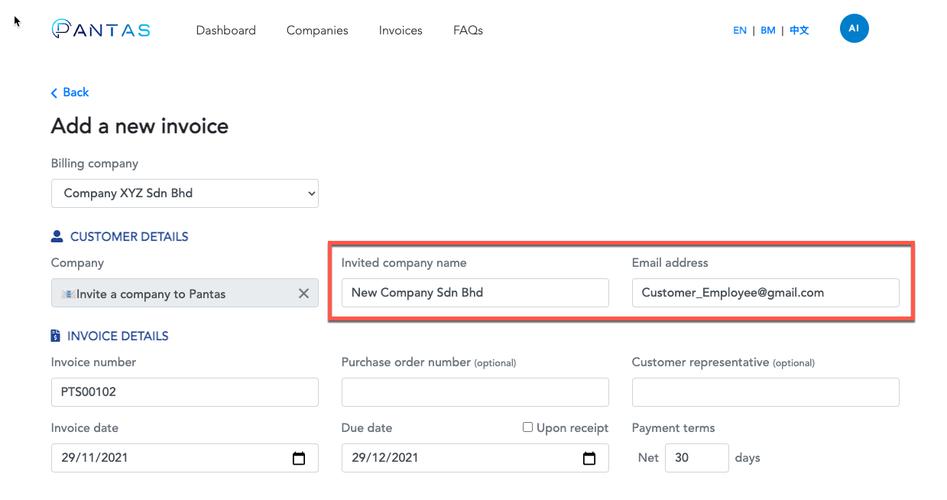
For sellers looking to record a receivable/sale from a buyer who is not on Pantas and you don’t foresee them signing up (due to one-off purchases or other reasons), you can search and select "Invite a company to Pantas", key in the customer's name in the "Invited company name" field and include your own email address under the "Email address" field. You can refer to the screenshot below:
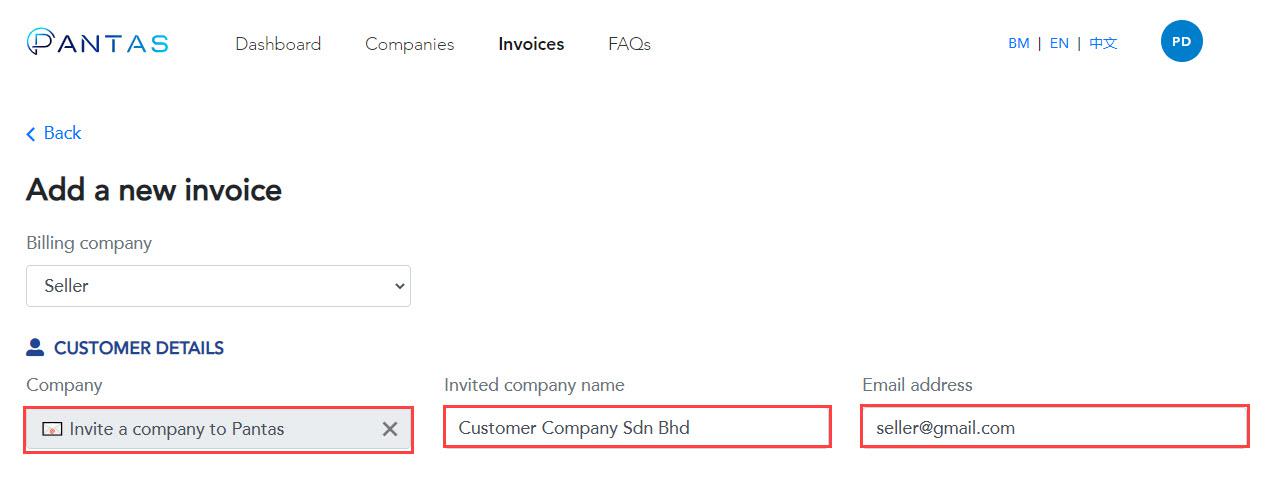
You can also look at section 4.2 for more information on this.
We are happy to hear from you! Please reach out to info@pantas.com our social media accounts or click on the "Contact us" link below and we will get back to you as soon as possible.
Alternatively, you can initiate a live chat with us by simply clicking the messenger icon at the bottom right corner of your screen.
2. Registration
To register an account at Pantas, please follow the link below:
3. Companies
This section is only applicable for businesses without a business registration number.
Pantas understands that some of its users may be just starting out and have not registered their business. The following steps outline what you need to do when adding businesses that do not have a business registration number into Pantas.
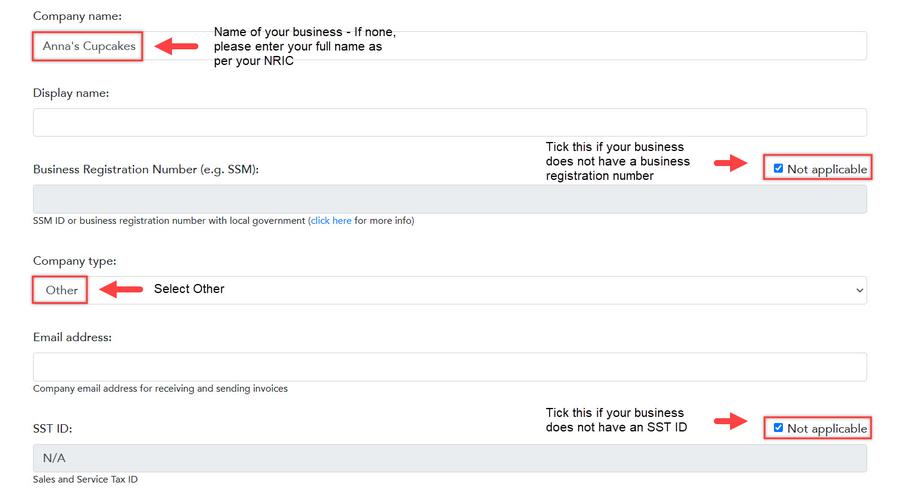
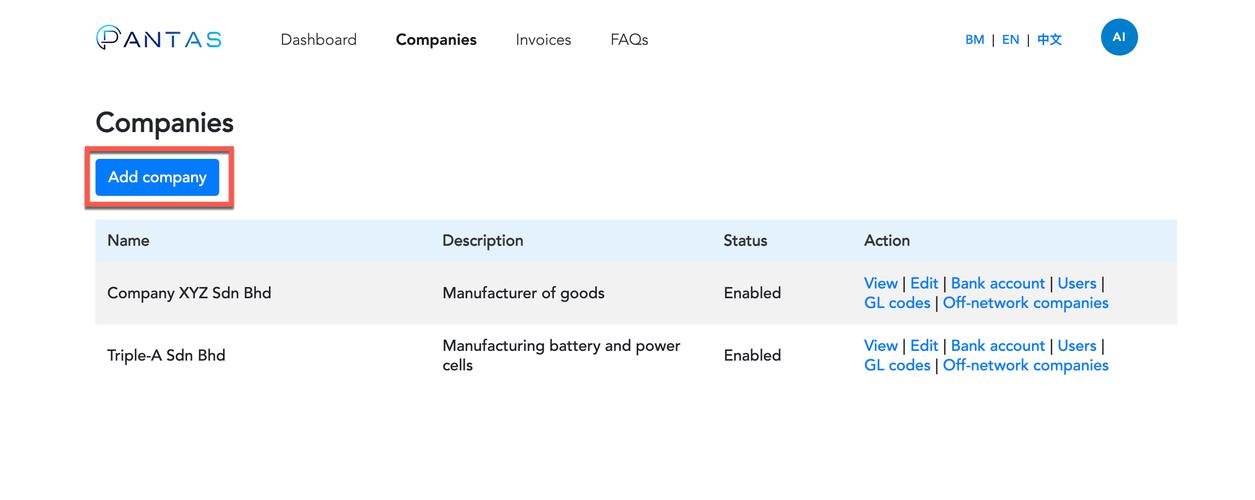
Under the Companies page, click "Add Company". Next, fill up the fields as you would for a company with a business registration number but with the following considerations of the fields below:
- Company name – Name of your business (e.g Anna's Cupcakes). If none, please enter your full name as per your NRIC.
- Business Registration Number (e.g SSM) – Tick the "Not applicable" checkbox if your business does not have a business registration number
- Company type - Select "Other"
- SST ID – Tick the "Not applicable" checkbox if your business does not have an SST ID.
Please refer to the photo below for guidance:
After registering on Pantas and logging in for the first time, you will be prompted to provide information on your company. Please click the link to start filling out your company details.
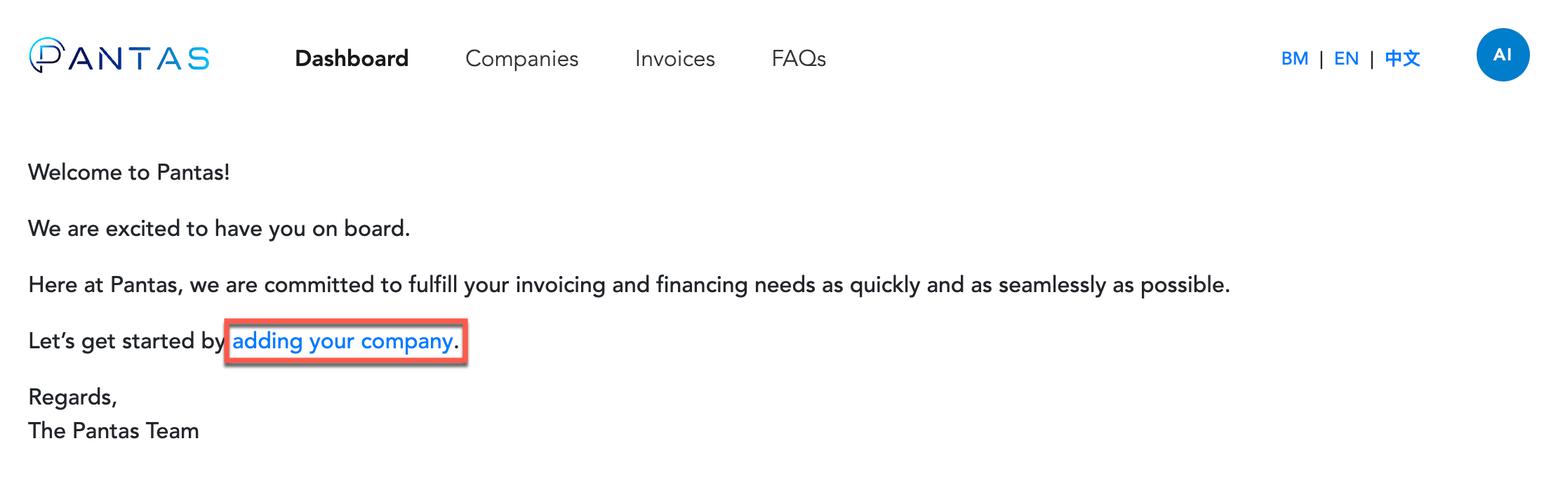
In case you have navigated away from this screen during your login session, simply click "Companies" on our navigation bar to get to the screen below.
You can also follow link below to start adding company details to your account:
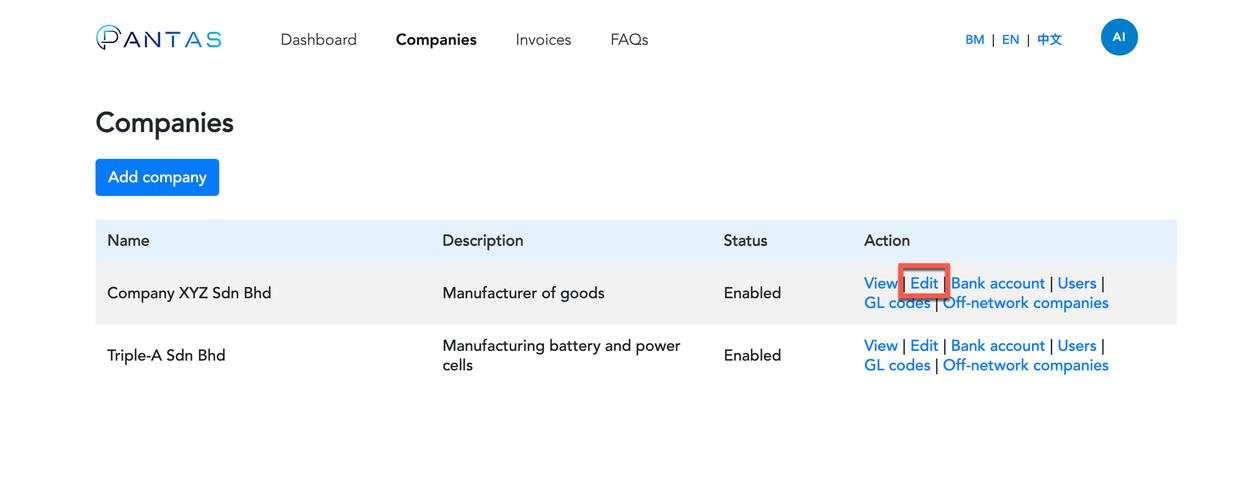
To edit company information, simply click "Companies" on our navigation bar to get to the screen below.

Here, you can click “Edit” and amend the necessary company details.
Take note that after initially submitting your company name, you are not able to amend this without assistance from our system administrator. To amend your company name, please email us at info@pantas.com with the relevant details and supporting information to make these changes.
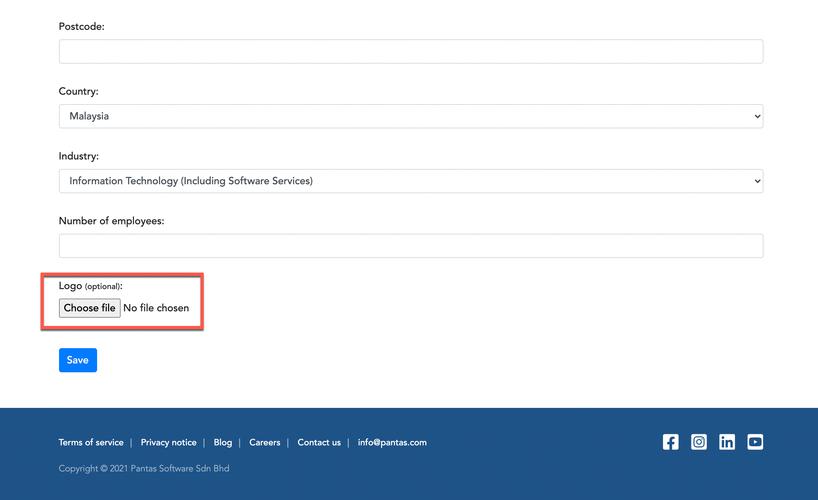
When adding a new company to your Pantas account, you will be prompted with a form and asked to upload a company logo. See screenshot below:

In case you already have a company registered on Pantas, simply click "Companies" on our navigation bar to get to the screen below.
Next, click on "Edit" and scroll to the bottom and look for "Logo" where you can then upload your company logo and then click "Save".
After adding a new company to your account, you will be prompted by our website to add a company bank account. Here, we include a link for you to click to start filling out your company's bank details.

In case you have navigated away from this screen, simply click “Companies” on our navigation bar to get to the screen below.
Here, simply click "Bank Account" to add the relevant bank details.
Take note that each company is only able to have one bank account so your customers will send their payments to the listed bank account.
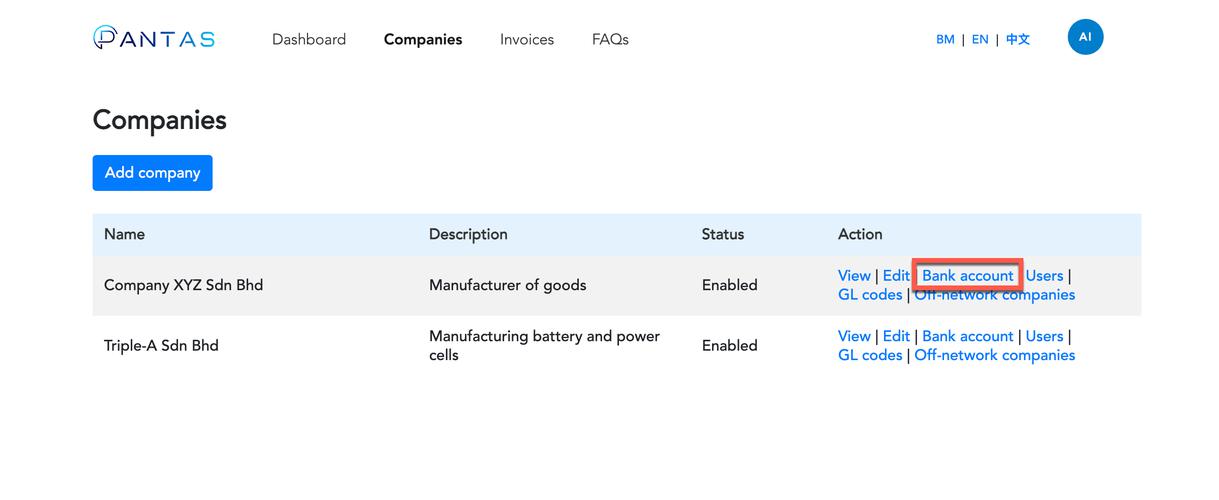
To edit a company bank account, simply click "Companies" on our navigation bar to get to the screen below.

Here, simply click "Bank account".
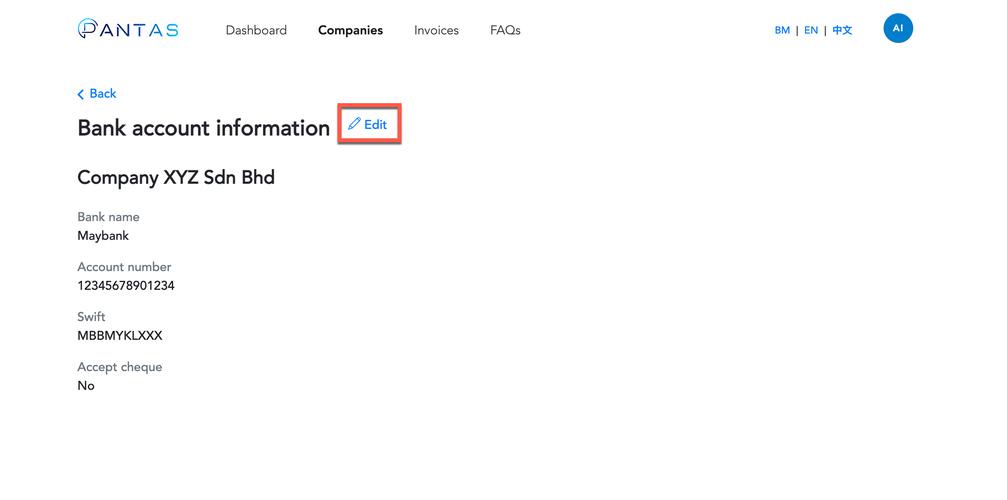
Next, click "Edit" to amend the relevant bank details.
To add a user/colleague to your company account, simply click "Companies" on our navigation bar to get to the screen below.

Here, click "Users".
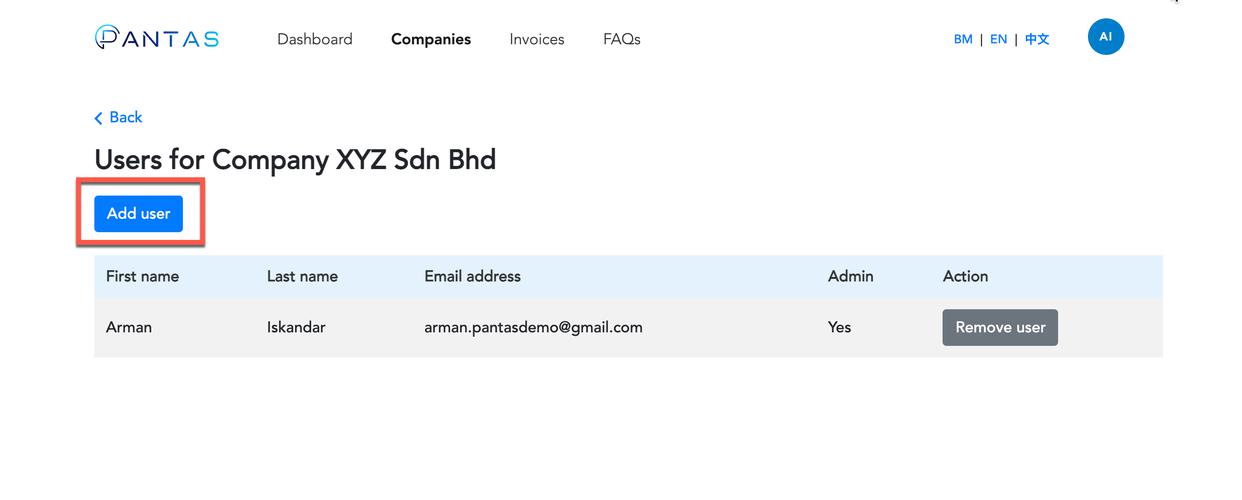
Next, click "Add User" and fill in the relevant user details. Here, you can designate admin rights if needed.
To remove a user, simply click “Companies” on our navigation bar to get to the screen below.

Here, click "Users".
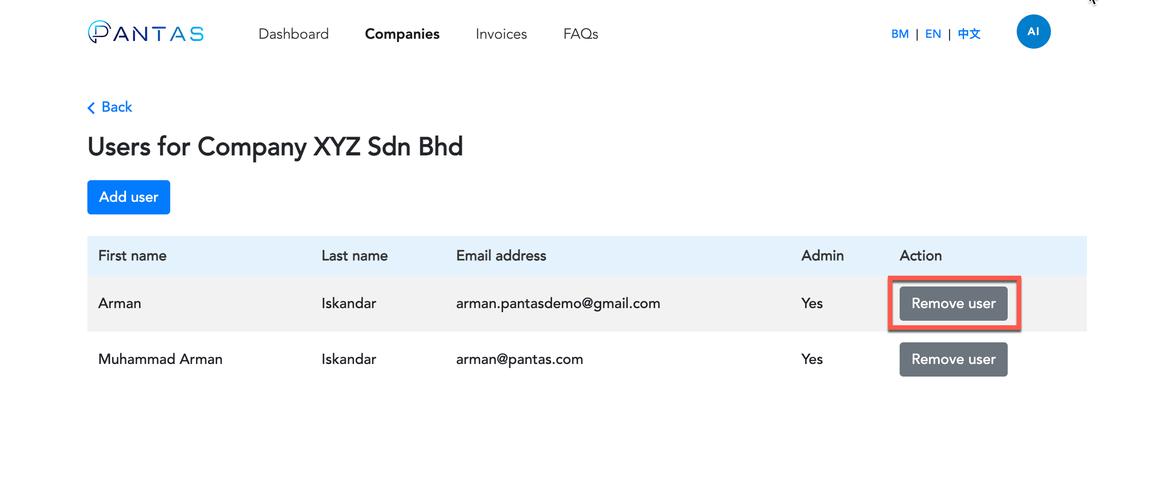
Next, click "Remove User" on the user you wish to remove.
Off-network companies are self-entered companies that a user can add to their Pantas account in order to record a bill*. These are companies who are not currently on Pantas and/or unlikely to have a Pantas account anytime soon.
*Record a bill is a feature on Pantas to record an account payable from a supplier/seller who is not on Pantas
By adding off-network companies into your Pantas account, you will be able to record account payables from suppliers/sellers - even if they are not on Pantas. Examples of this include companies that issue utility bills (electricity, water bills or telephone bills) or invoices from suppliers/sellers who do not have a Pantas account (e.g large companies with complex systems).
To add an off-network company, simply click "Companies" on our navigation bar to get to the screen below.

Here, click "Off-network companies".
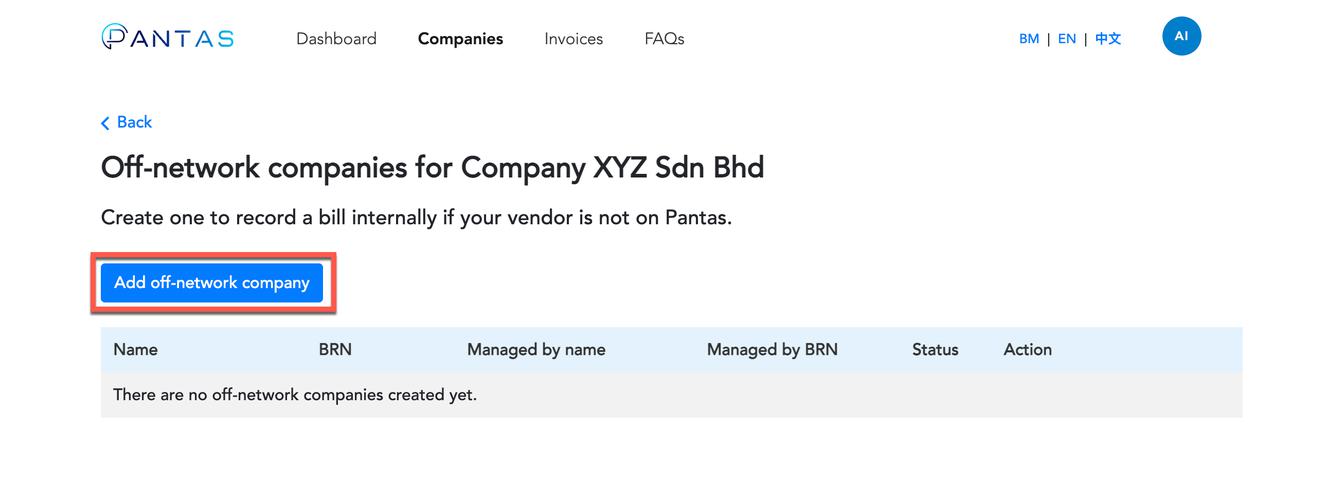
Next, click "Add off-network company" and start adding your sellers/suppliers who are not on Pantas. This allows you to utilize our "Record a bill" feature to record bills/payables from non-Pantas sellers/suppliers.
To edit an off-network company, simply click "Companies" on our navigation bar to get to the screen below.

Here, click "Off-network companies".
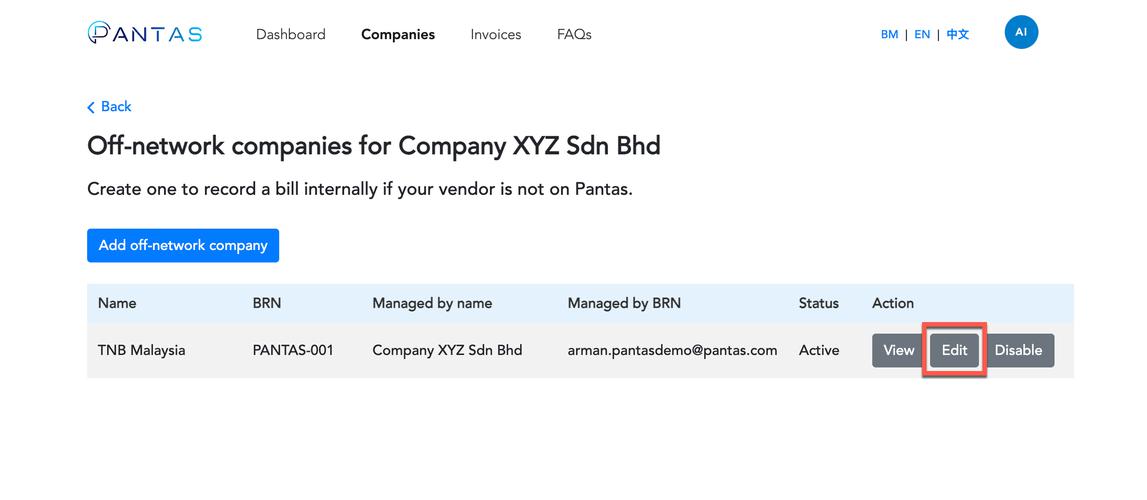
Next, click "Edit" for the off-network company you'd like to edit.
General ledger (GL) codes can be added to your company to better organize your expenses and to reduce the time spent integrating with your accounting software (if any).
Examples of GL codes include:
1000 - Raw Materials
2000 - Marketing Expenses
3000 - Consultancy Fees
With GL codes, you are able to categorize your expenses on Pantas as you see fit.
One of the benefits in utilizing GL codes is the ability to perform extremely quick data analysis and reporting. If you need to know exactly how much was spent on raw materials at a specific location over the course of a quarter, you can simply search for the corresponding GL Code and every transaction meeting those parameters is instantly visible. If you need to compare one of your locations to another location – simply pull up the GL Codes for each branch and compare the data.
To add general ledger (GL) codes to a company, click "Companies" on our navigation bar to get to the screen below.

Here, click "GL codes".
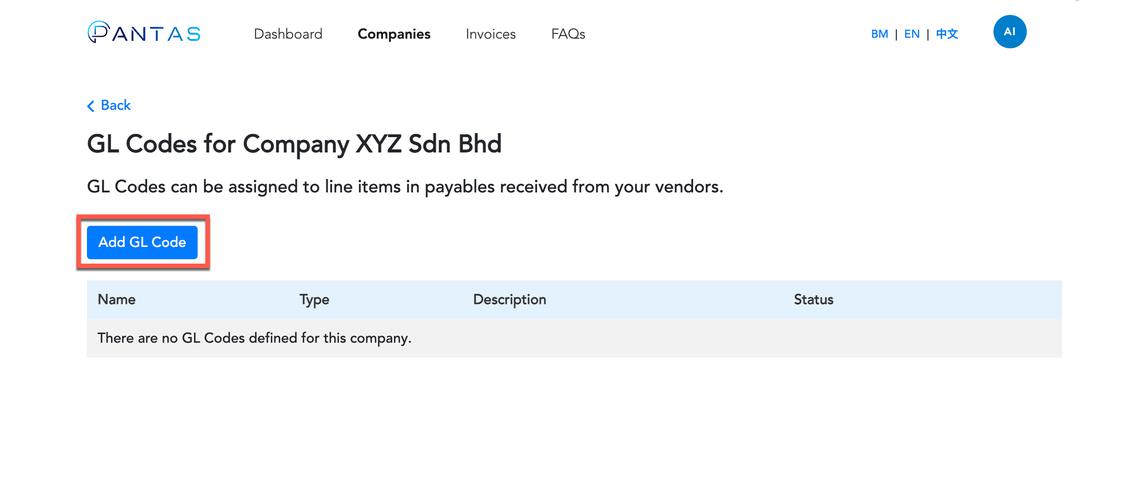
Next, click "Add GL Code".
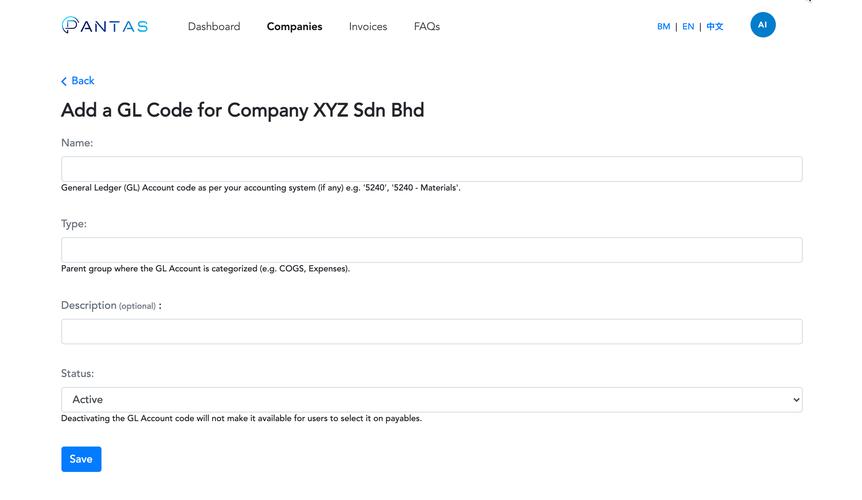
Here, fill in the respective details and hit save. The general ledger (GL) code will now be accessible by the companies you have added them to.
To edit general ledger (GL) codes, simply click "Companies" on our navigation bar to get to the screen below.
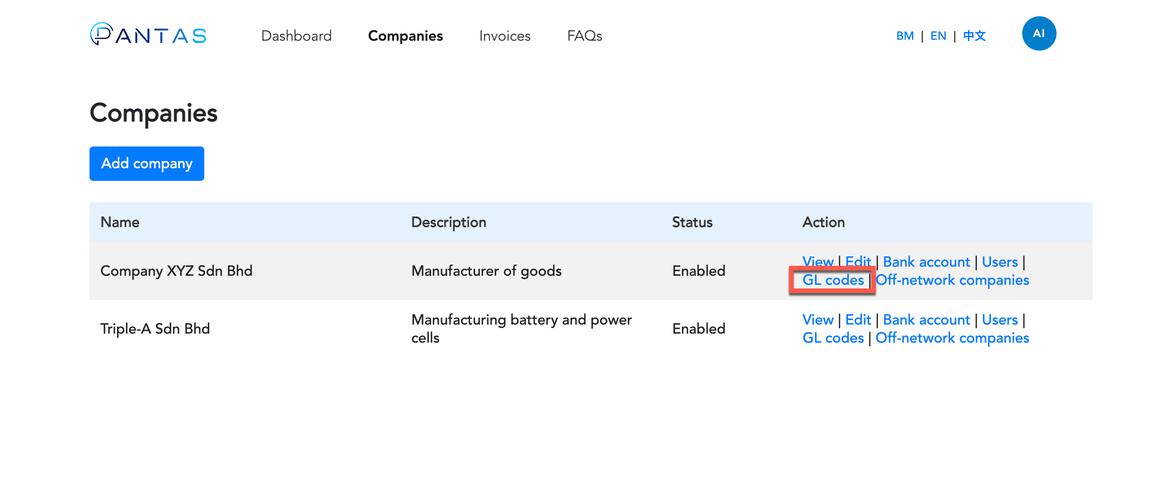
Here, click "GL codes".
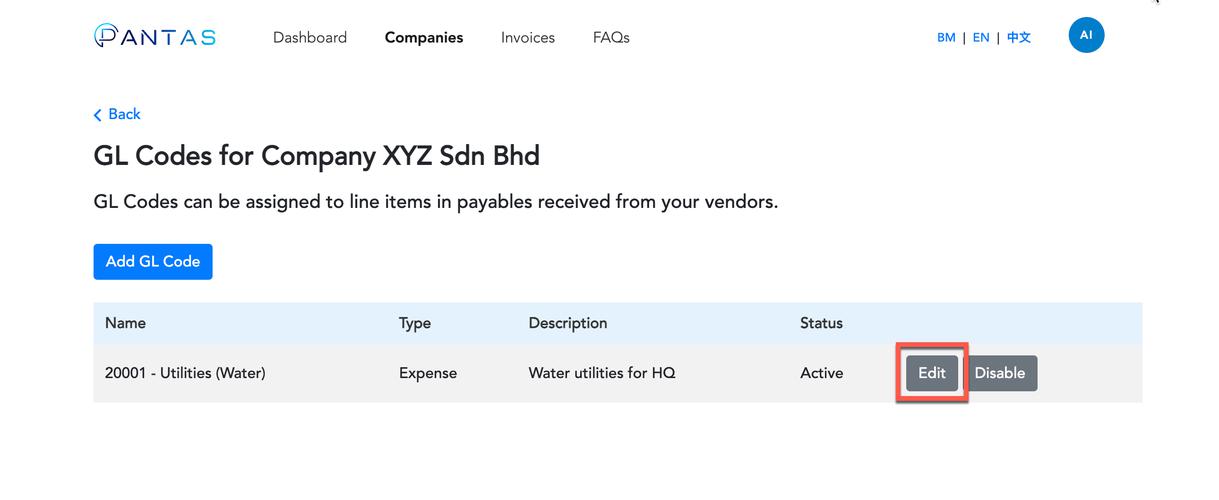
Next, click "Edit" on the respective general ledger (GL) code you wish to edit.
4. Invoices
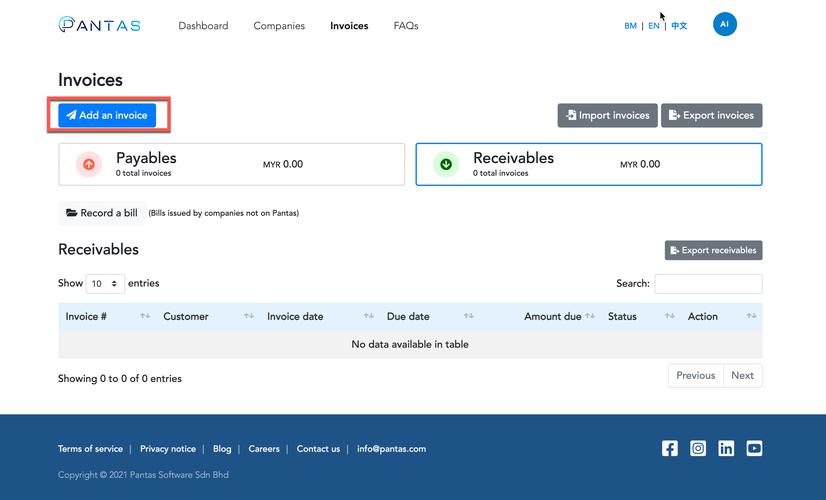
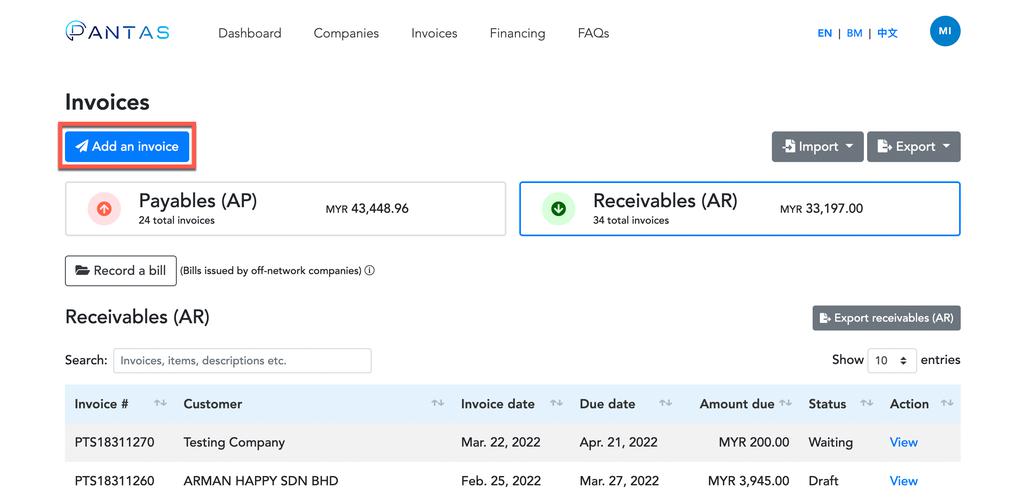
To send an invoice, visit the ‘Invoices’ page. On the top left of the page, find ‘Add an invoice’, click on it and fill in the relevant invoice details.
You can refer to our Pantas User Guide for a step-by-step explanation of what each field means and what to fill in. Kindly refer to Section 7.1 to download the guide.
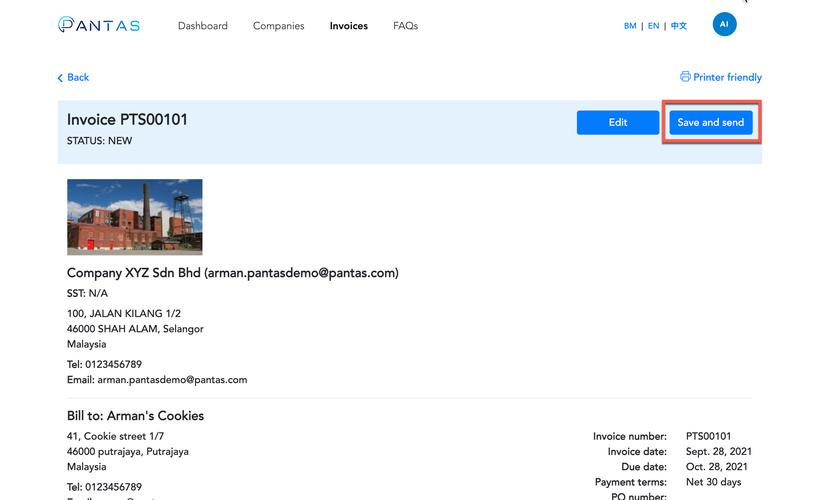
Once this invoice is created and filled, press 'Preview' at the bottom of the page to proceed to the next page as shown below. Here, press 'Save and send' to send the invoice to your buyers.
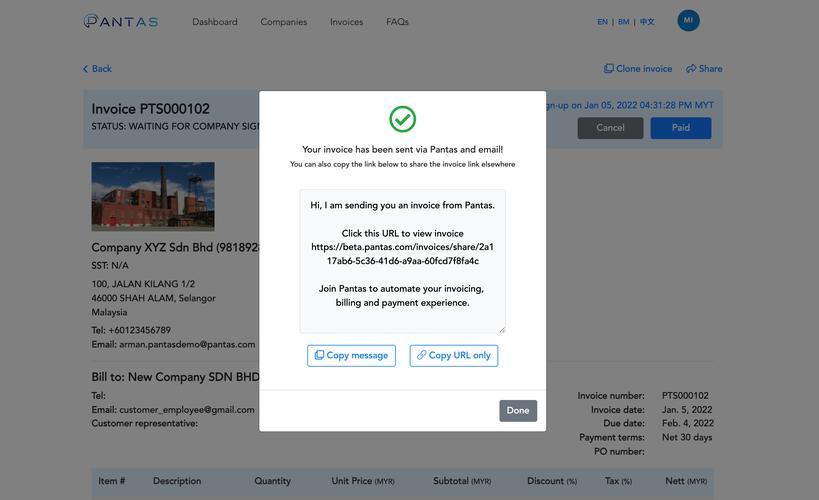
Once sent, you will see a popup that lets you copy and send a URL/link to anyone you wish to be notified of the invoice. You can send it via Whatsapp, email or other communication channels as desired.
The recipient will be asked to log into Pantas to take action on the invoice.
Note:
- They will receive an email notification on the new invoice and the invoice will be saved under your company automatically.
- This link will only be accessible for user accounts that are associated with the receiving company. No other Pantas user or non-Pantas user can view the invoice via the private link.
Below, we have a video tutorial on how to send an Invoice via Pantas.
To enjoy the full benefits of Pantas, we recommend having both your buyers and sellers registered on the platform.
We made it easy for you to invite your customers to Pantas during the invoicing process. This includes customers who will not register on Pantas anytime soon. Read on to learn how.
Here's how you can send an invoice and invite a company to Pantas at the same time:
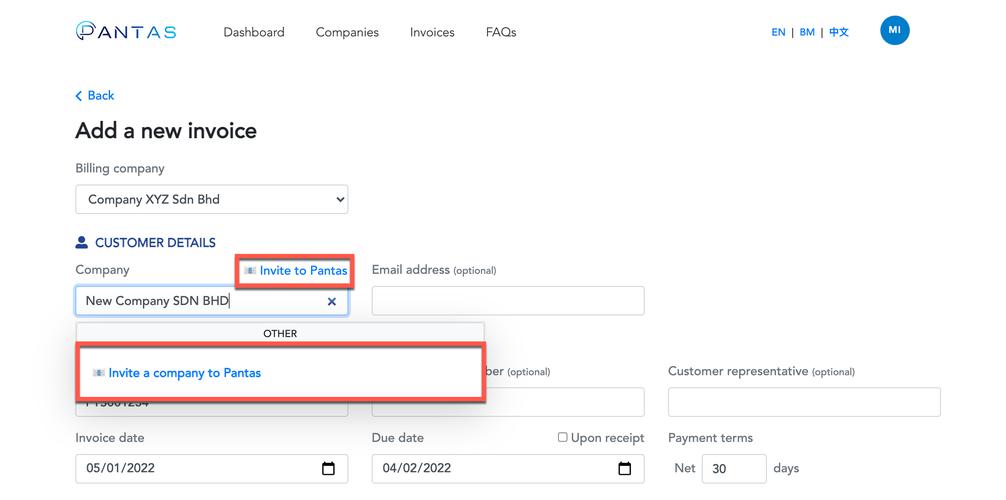
When creating a new invoice, simply click on the 'Invite to Pantas' text or type the new customer's company name in the 'Company' field directly. For the latter, you will see a dropdown that reads 'Invite a company to Pantas'. Click on either of them to continue. See screenshot below:
Once you click on either the text or dropdown, you will see two additional fields. They are 'Invited company name' and 'Email address'. Here, fill in with the relevant information.
Important: The email address you input has to be the same email address the recipient uses to sign up on Pantas, i.e. customer_employee@gmail.com.
Next, fill in the invoice details accordingly. Then, click 'Preview' to confirm the invoice details and click 'Save and send'.

Your new customer will receive an email notification to view the invoice and will be directed to register their company on Pantas.
Here’s how you can send an invoice as a link (URL):
This also caters to customers who will not register on Pantas anytime soon.
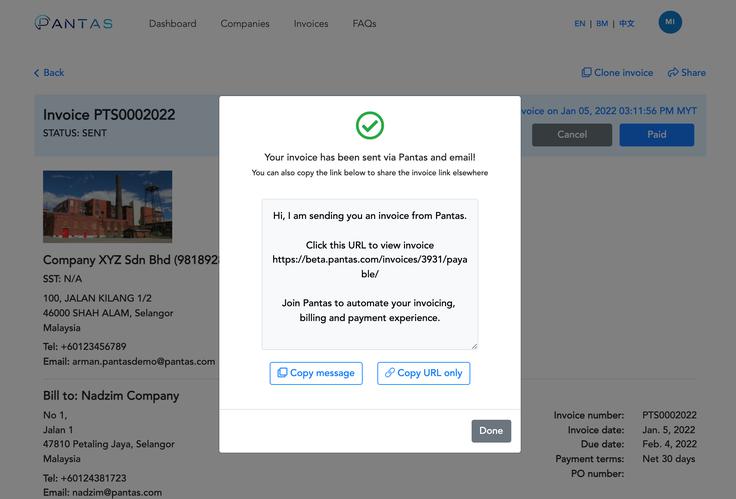
Once the invoice is sent, you will see a popup that provides you the option to send the invoice via a URL to anyone you wish to view the invoice. You can choose to share the link via Whatsapp, email or other communication channels as desired.
Please note that the URL is public and therefore is accessible for anyone. Do share it with the intended recipients directly.
What the recipient would see after clicking on the URL:
Customers can view the invoice via the URL. They can choose to select ‘Pay’ on the top right of the invoice. Here, they will see two options, ‘Pay as guest’ and ‘Yes’.
1) Selecting ‘Yes’:
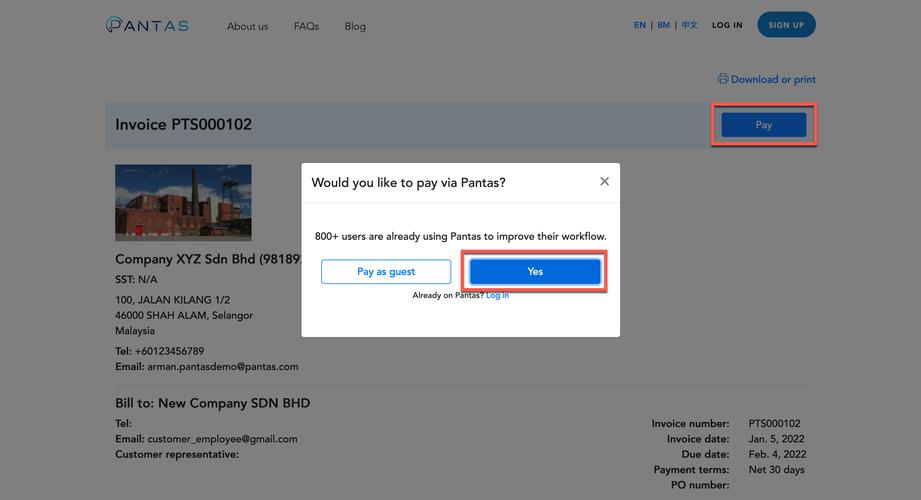
- The customer will be brought to the sign up page where they can set up their company on Pantas.
- The invoice will be saved automatically under their registered company and all the features will be available to them once they register.
- You will also be notified via email once they successfully sign up.
2) Selecting ‘Pay as guest’:
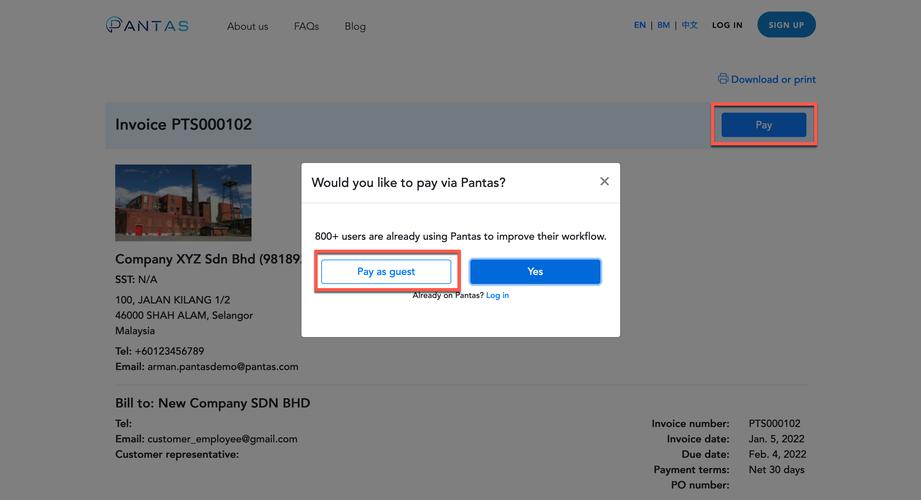
- This action is suitable for one-off customers.
- Once selected, the customer will be prompted to fill in the payment details as the payment confirmation. This information will then be reflected on the audit trail of the particular invoice which you have access to.
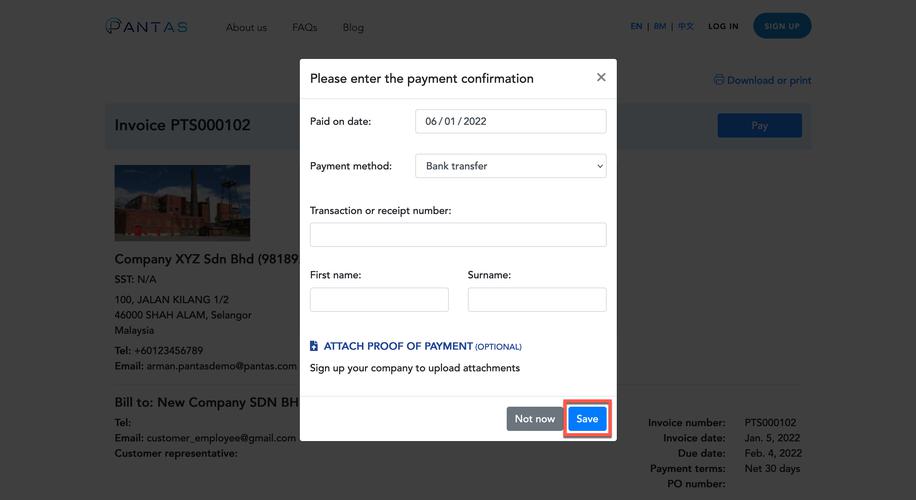
- You will be notified once the customer updates the payment confirmation.
Note:
- Upon buyer’s successful signup on Pantas, the invoice’s public URL will automatically expire for privacy purposes and a new private URL can be generated through the same steps if needed, see Section 4.3 - How do I reshare my invoice URL .
- These URLs/links expire 60 days after the invoice due date. This ensures data security for your invoices. After expiry, the URL to the invoice can be regenerated again through the same flow as mentioned above and will expire after 60 days from the regeneration date.
- Alternatively, you can download the invoice as PDF and send it through any channel you like.
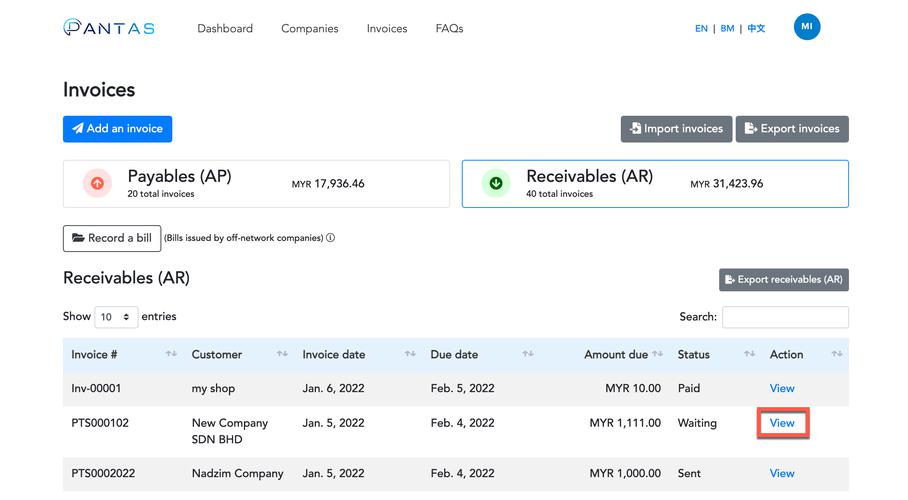
To resend an invoice URL, visit the ‘Invoices’ page, find the invoice and click ‘View’.
Find the ‘Share’ button on the top right of the page and select ‘Copy URL’. The URL is automatically copied and you can share it with your intended recipient.
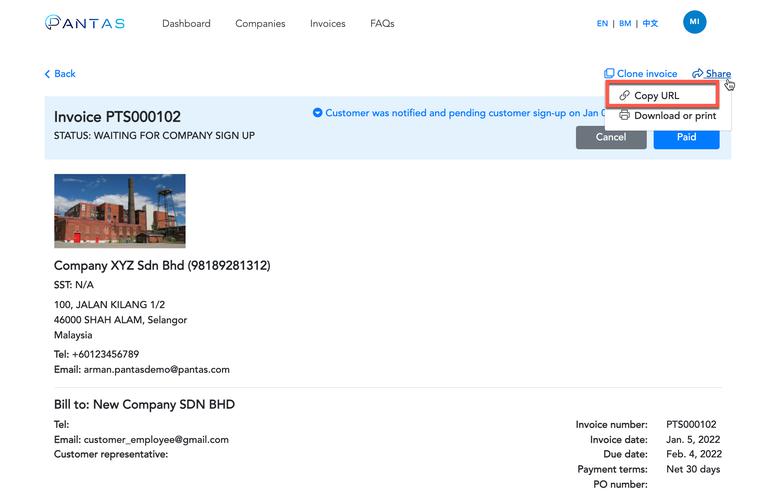
You can come back to the invoice and share the URL/link at any time.
To upload an attachment to an invoice or bill, simply go to "Invoices" on the top navigation bar to get to the page below.
To create a new invoice or bill with attachment, click "Add an invoice" or "Record a bill".
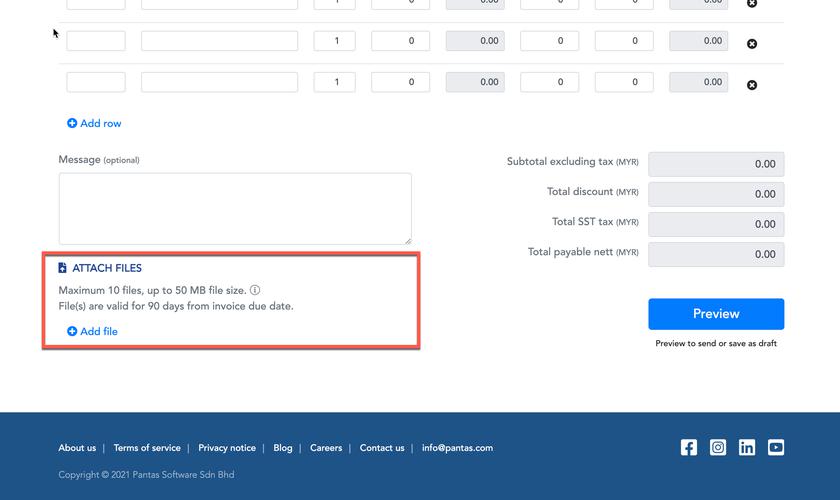
Once you have filled in the invoice/bill details, navigate to the bottom of the page to find a section labelled "Attach files". Here, you will be able to click on "Add file" to upload your attachment(s).
Then, click "Preview" and select "Save and send" (for invoices) or "Save and confirm" (for bills).
The attachment will now be accessible via the invoice/bill where it can be viewed or downloaded.
To upload attachments to existing invoices or bills, simply click on "View" on the specific invoice or bill and scroll down to the "Attach files" section at the bottom of the invoice page. Then, click on "Add file" to upload your attachment(s).
Note:
You can upload up to 10 files per invoice with a total size limit of 50 MB
Pantas supports the file formats as follows:
- Picture: jpeg, jpg, png
- Document: doc, docx, pdf
- Spreadsheet: xls, xlsx
- Compressed file: zip, gzip, rar, 7z
These files are valid up to 90 days after the invoice/bill due date.
To save an invoice as a draft, simply go to “Invoices” on the top navigation bar to get to the page below.

Next, click “Add an invoice” and fill in the relevant invoice details.
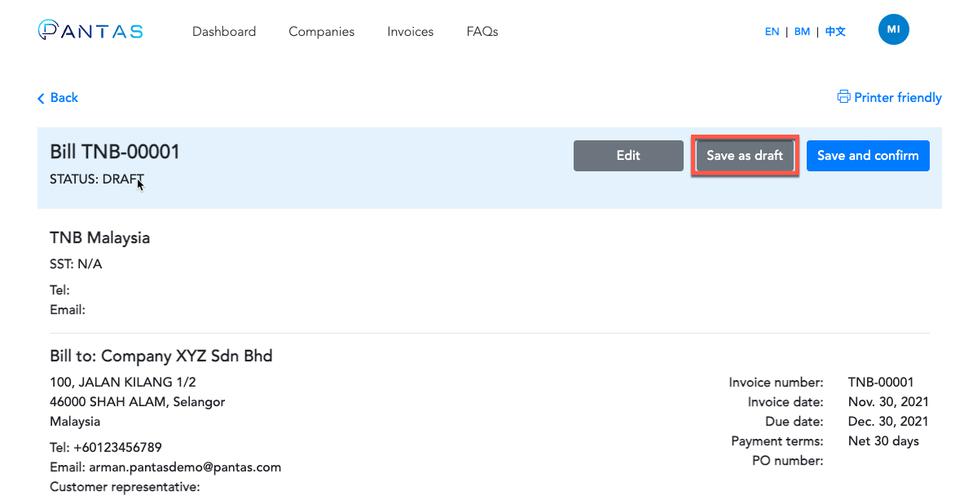
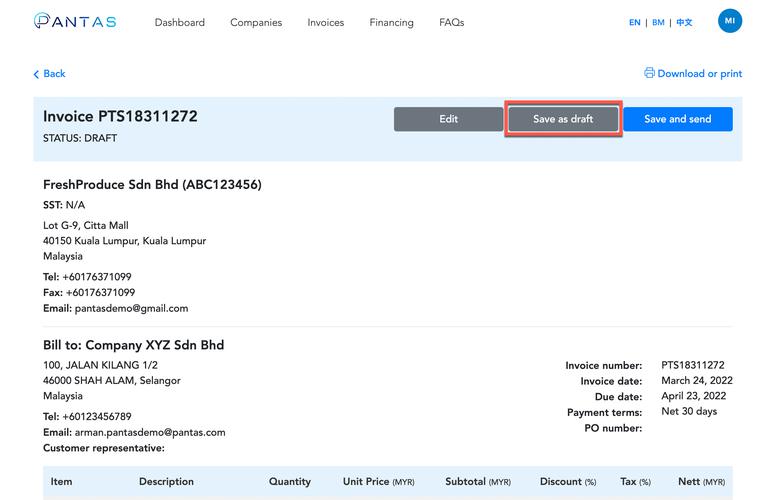
Once you have filled in the invoice details and clicked “Preview”, click “Save as Draft” and it will now be saved as a "Draft" invoice whereby you have the option to edit, delete or send the invoice.

Note:
Invoice drafts will only be saved once “Save as draft” is clicked. Drafts will not be sent until you click on “Save and send”. Same applies to the “Record a bill” feature.
To import invoices, simply click "Invoices" on our navigation bar to get to the screen below.
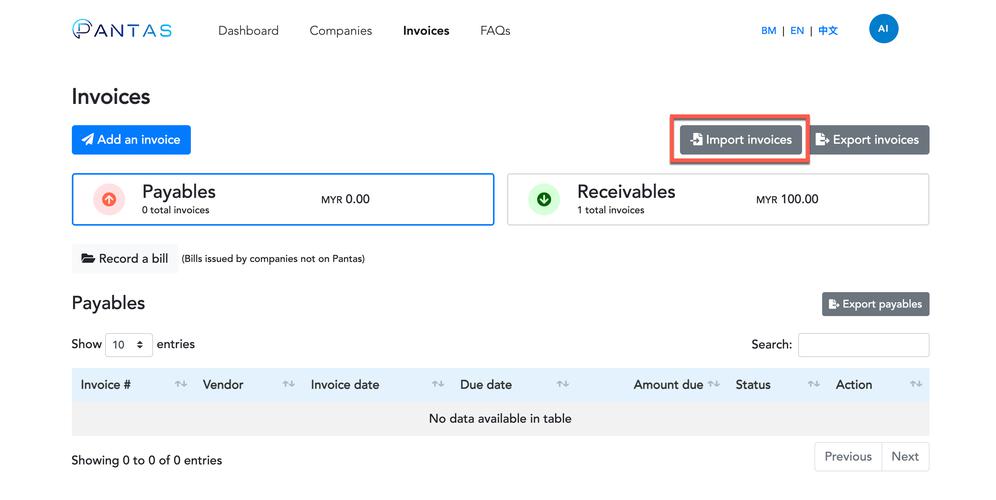
Here, click “Import Invoices” to get to the screen shown below.
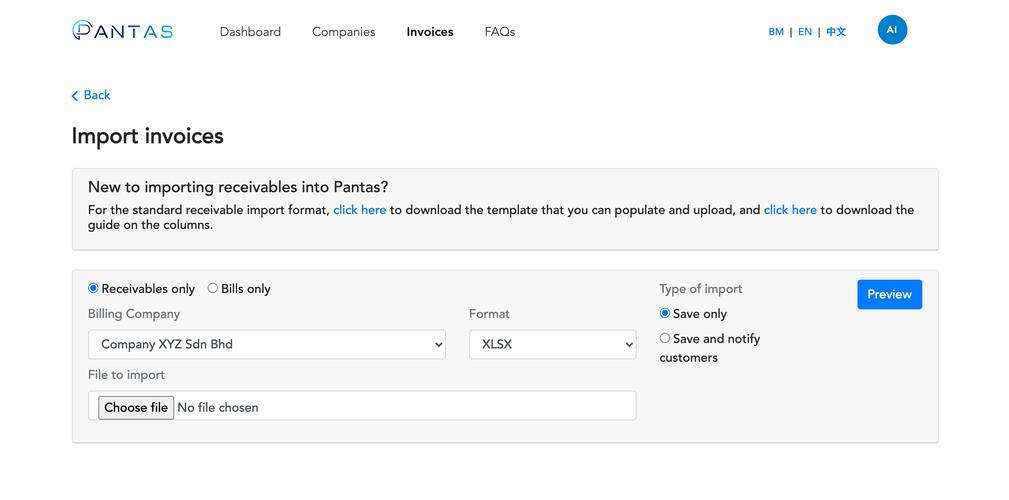
At the top of this page, you can download the import template and respective column guide to help guide you through the import process.
After populating the import data, select:
- The option between importing receivables or bills (payables from off-network companies)
- The billing company that you wish to import invoices into
- The preferred file format (Currently we support XLSX, XLS and CSV)
- File to import
- Type of import
- Save invoices only (Saves within your Pantas company account only)
- Save invoices and notify customers (Saves within your Pantas company account and sends invoices to customers)
Next, click "Preview" to confirm the invoice details and import accordingly based on your type of import selected.
Below, we have a video tutorial on how to import invoices.
To export invoices, click "Invoices" on our navigation bar to get to the screen below.
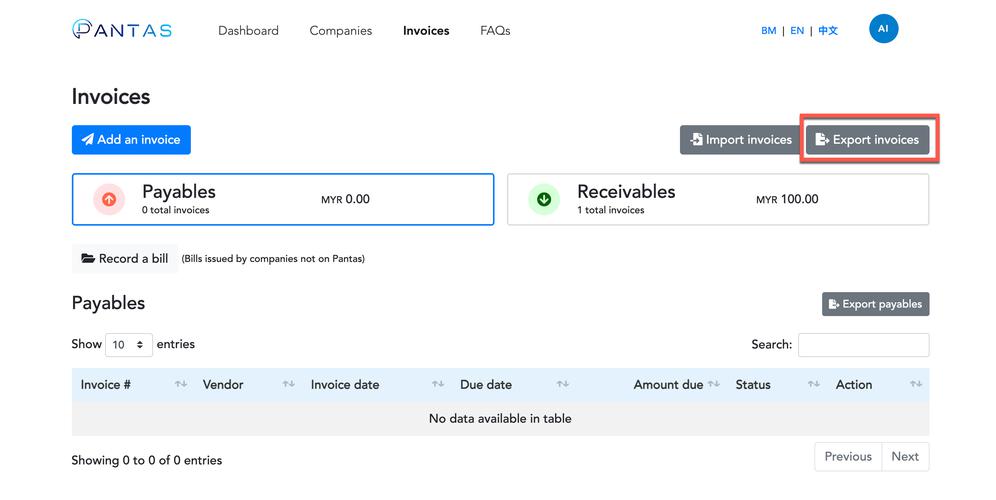
Here, click "Export Invoices" to get to the screen shown below.

On this page, select:
- The billing company that you wish to export invoices from
- The preferred file format (Currently we support XLSX, XLS and CSV)
- Start invoice date (date on when to start importing the invoices)
- End invoice date (date on when to stop importing the invoices)
- Select between exporting receivables or bills (payables from off-network companies)
Next, click "Export Data" to download the file locally to your device.
Below, we have a video tutorial on how to export an Invoice via Pantas.
To accept or reject an invoice, simply click "Invoices" on our navigation bar to get to the screen below.

Here, simply click "View" on the invoice you wish to action upon.
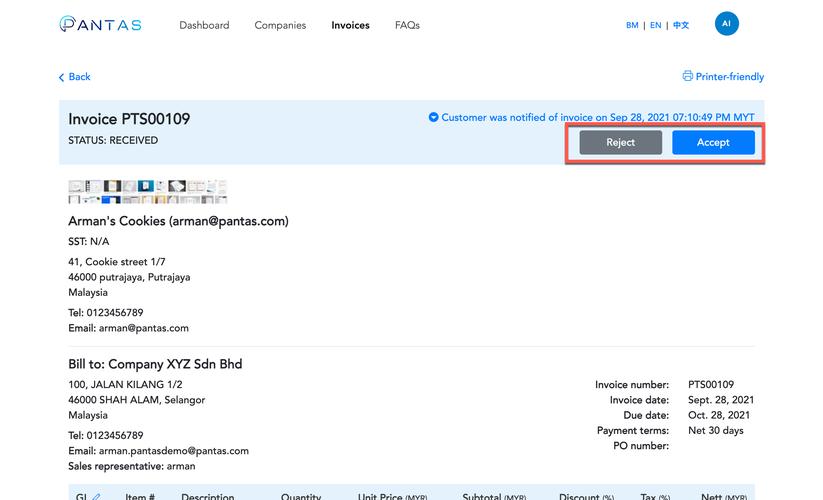
Next, click "Accept" or "Reject" accordingly.
Take note that, when rejecting an invoice, it is mandatory to include a reason for the rejection.
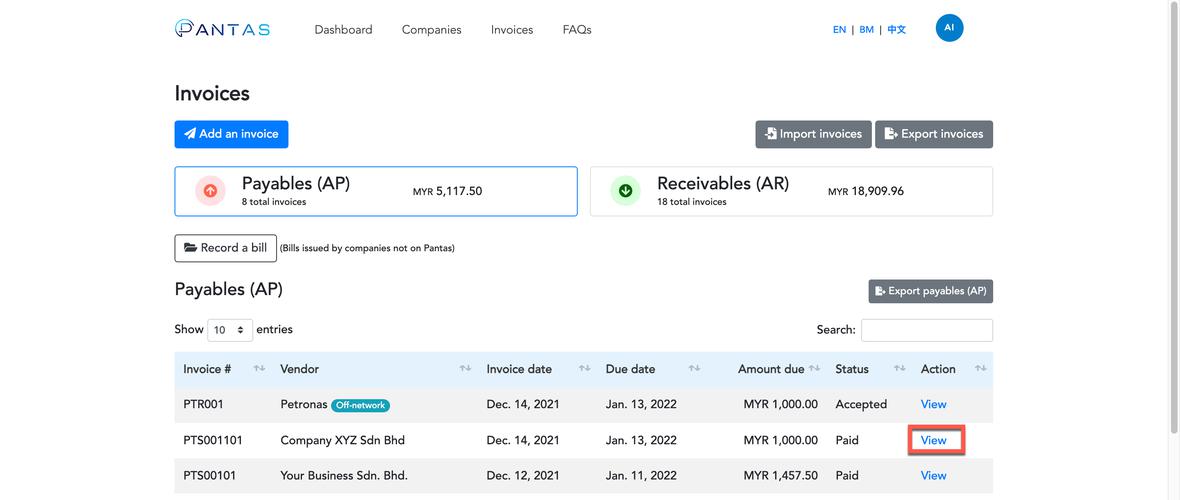
To mark an invoice as paid, simply click "Invoices" on our navigation bar to get to the screen below.
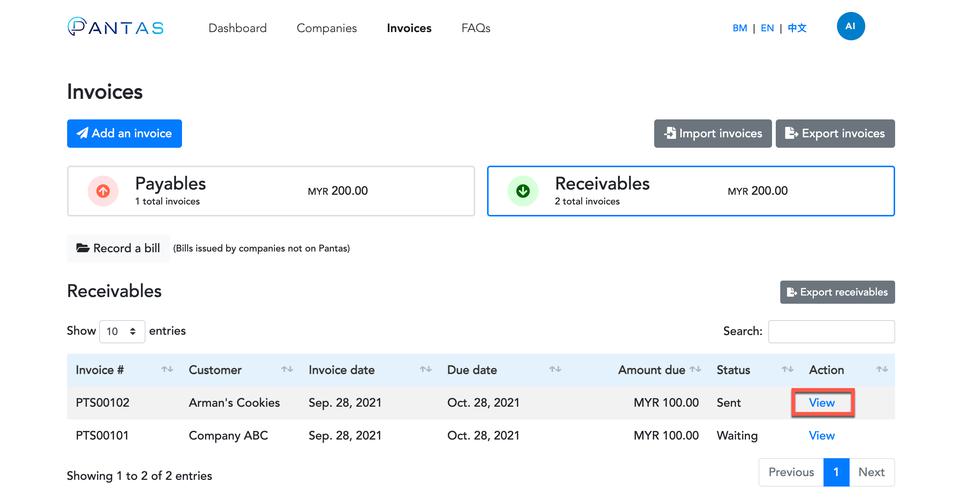
Here, simply click "View" on the invoice you wish to mark as paid.
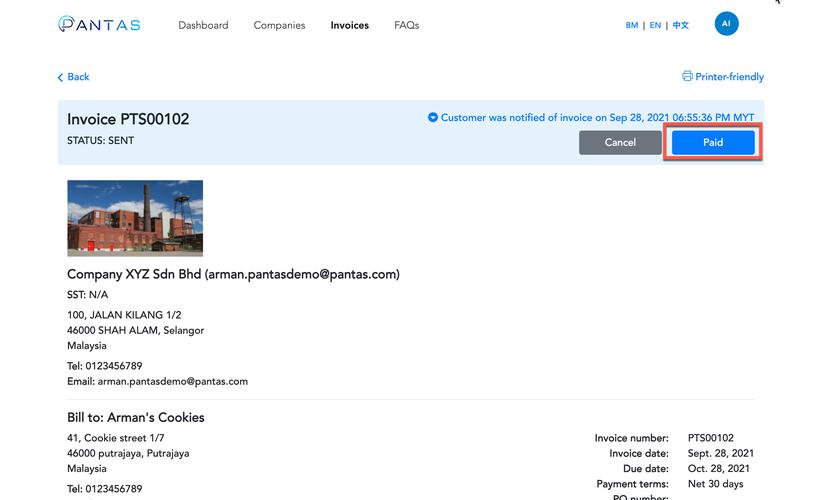
Next, click "Paid".
Take note that when marking invoices as paid, you will be prompted to key in the payment confirmation details (Date of payment, payment method and transaction/receipt number).
‘Proof of Payment’ can be a copy of receipt, bank transfer slip etc. To upload your 'Proof of Payment' to the payable invoice or bill, visit the ‘Invoices’ page and find the specified payable invoice or bill, then click 'View'.
One the top right-side of the page, find and click 'Paid' and you will see a popup.

Here, fill in the details and you can upload your 'Proof of Payment', i.e. bank transfer slip or receipt. Then, click 'Save'.

The 'Proof of Payment' attachment will now be accessible to your Pantas-registered suppliers when they view the invoice on their side.
This feature will also be available for our 'Record a bill' feature, for you to record your payment proof.
Note:
You can upload only one (1) payment proof per invoice with a total size limit of 10 MB. You cannot add or edit the file once it is saved. These files are permanently saved on Pantas.
Pantas supports the file formats as follows:
- Picture: jpeg, jpg and png.
- Document: pdf.
The record a bill feature on Pantas is used to record account payables from suppliers/sellers who are currently not on Pantas.
Previously, if your supplier/seller was not on Pantas but issued you an invoice, there was no way for Pantas to capture that transaction as the origin of the invoice stemmed from the invoice issuer. We understand from our user's perspective that not all their suppliers/sellers will be on Pantas and hence users have the ability to record a bill from off-network companies*.
Bills are your company's account payables.
*Off-network companies are self-entered companies that a user adds to their Pantas account. These are companies who are currently not on Pantas and/or unlikely to have a Pantas account anytime soon
Even if your supplier/seller is not on the platform - you will be able to record all account payables via Pantas easily. Examples of this include utility bills (electricity, water bills or telephone bills) or invoices from large companies adopting complex invoicing systems with lots of moving parts.
That being said, we still highly encourage both buyers and sellers to be on Pantas - to enjoy the full benefits of our platform and have a seamless user experience! Our team actively works to onboard new users everyday and collaborates with buyers to onboard their supplier network.
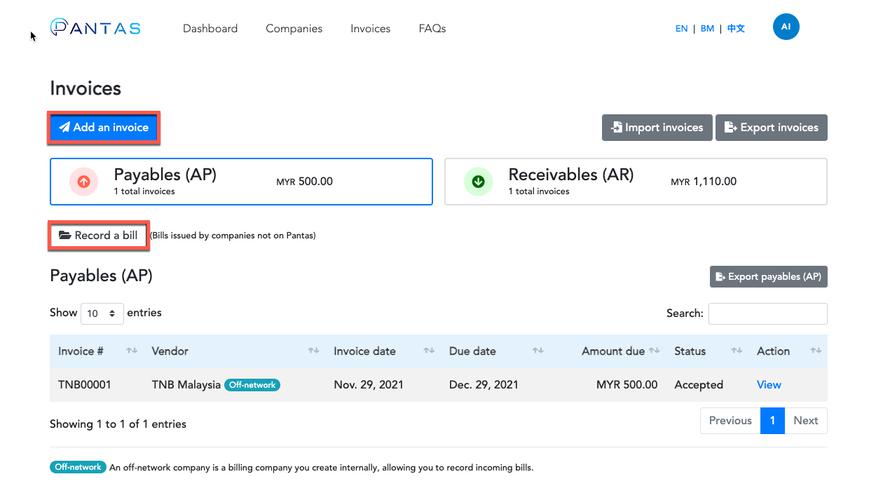
To record a bill, simply click "Invoices" on our navigation bar to get to the screen below.
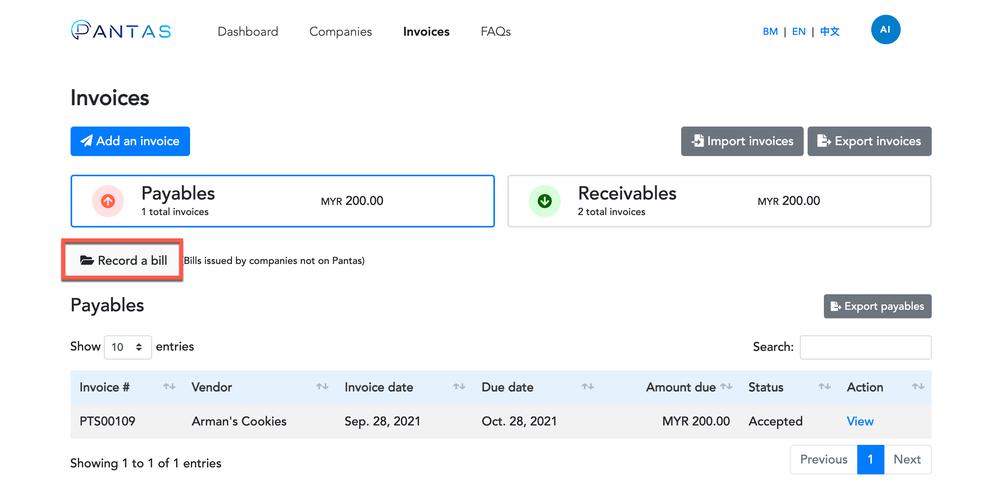
Here, simply click "Record a bill".
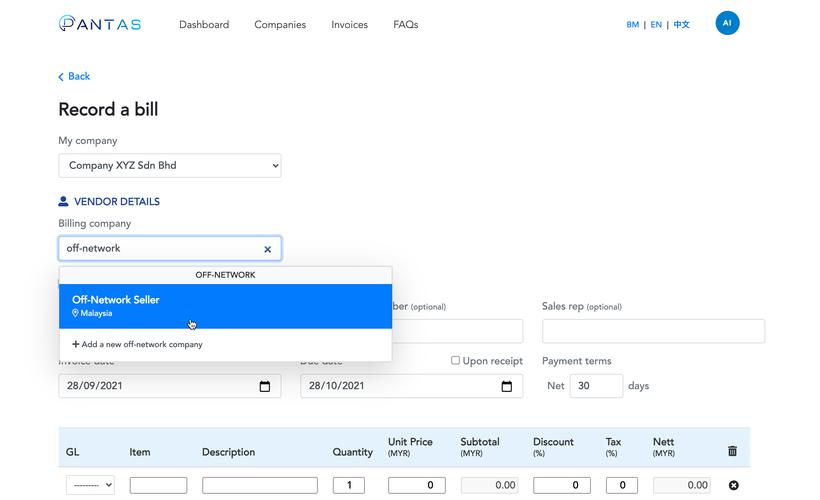
Next, select the billing company (In this example, you can see that Company XYZ Sdn Bhd selected "Off-Network Seller" as the billing company).
Lastly, fill in the invoice details as per a normal invoice, click preview and then save the bill.
To save a bill as a draft, simply go to “Invoices” on the top navigation bar to get to the page below.
Next, click “Record a bill” and fill in the relevant bill details.
Once you have filled in the bill details and clicked “Preview”, click “Save as Draft” and it will now be saved as a "Draft" bill whereby you have the option to edit, delete or confirm the bill.
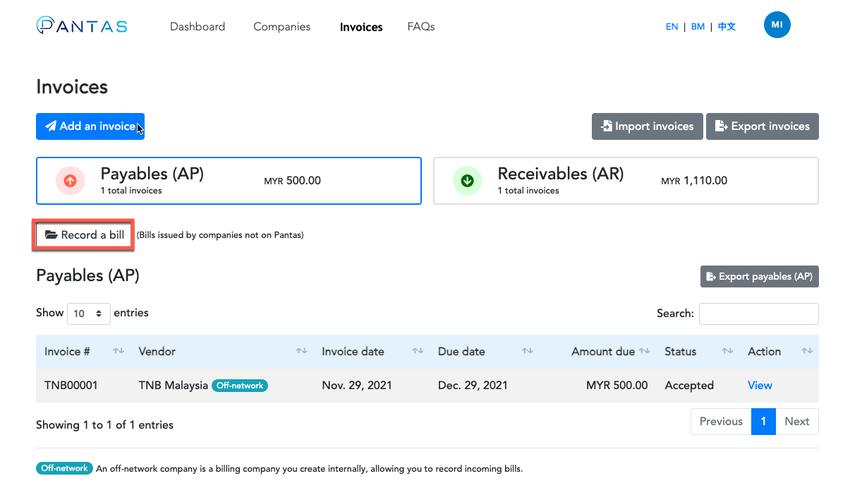
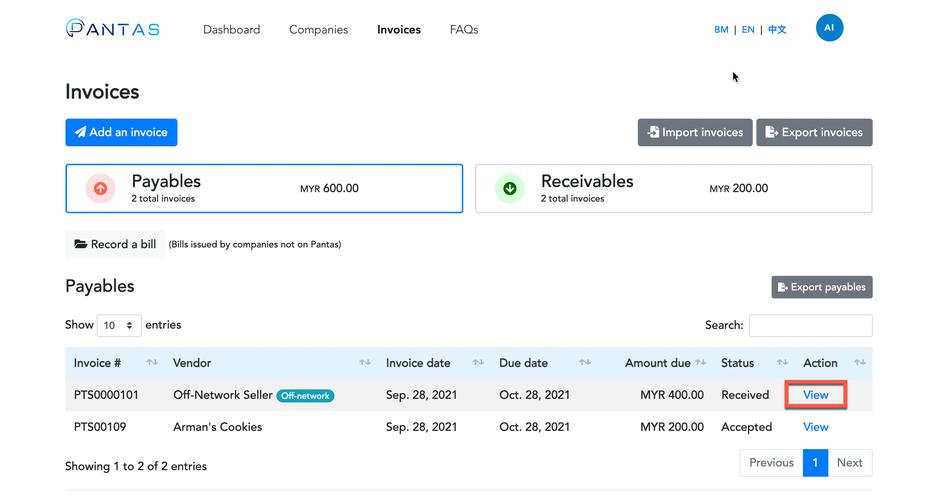
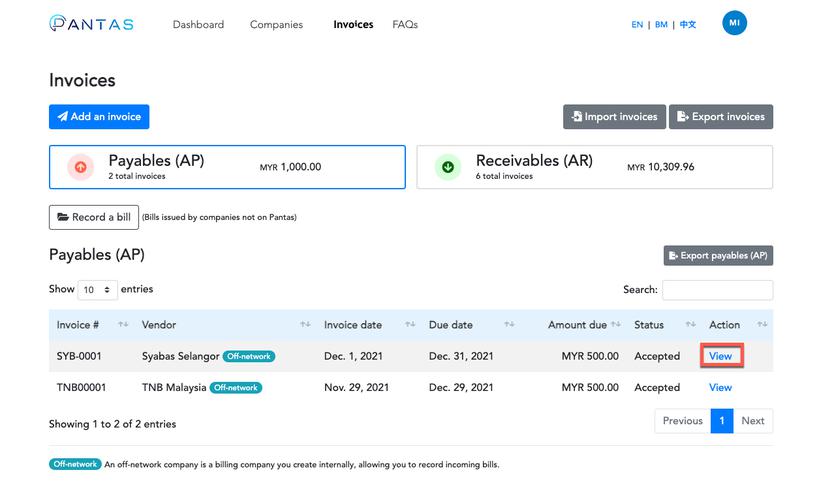
To cancel a bill created via the "Record a bill" feature, simply go to "invoices" on the top navigation bar to get to the screen below.
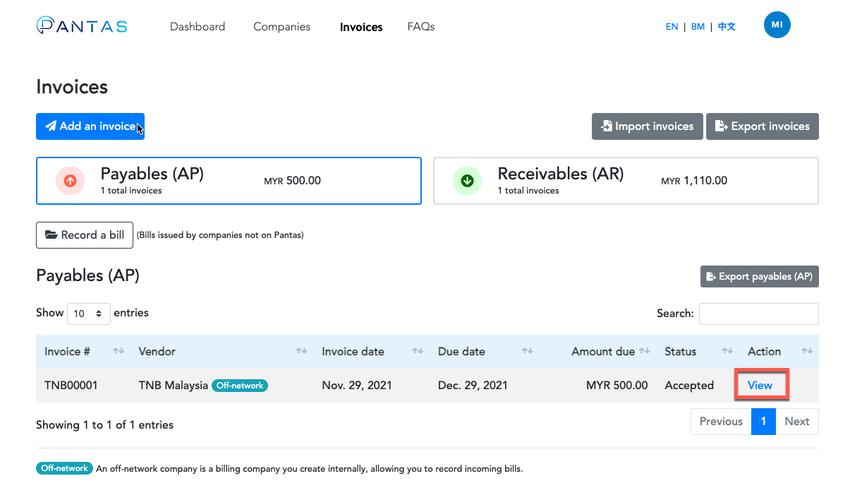
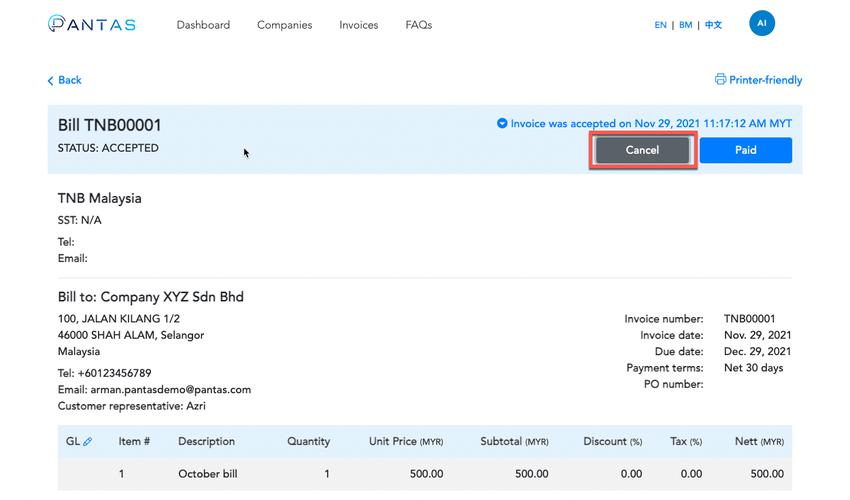
Next, find the desired bill/payable and click on "View". You should also see a blue label named “Off-network” next to the vendor’s name.
On the preview page of that bill, simply click "Cancel" and insert the reason for cancellation. The status of the bill will be updated to “cancelled” once done.
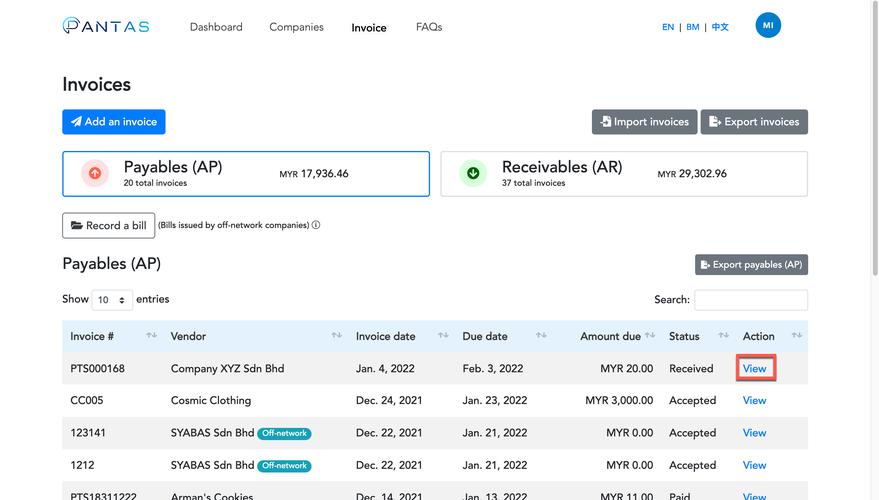
To assign general ledger (GL) codes to payables which currently do not have codes, click "Invoices" on our navigation bar to get to the screen below.
Here, simply click "View" on the invoice you wish to assign a general ledger (GL) code to.
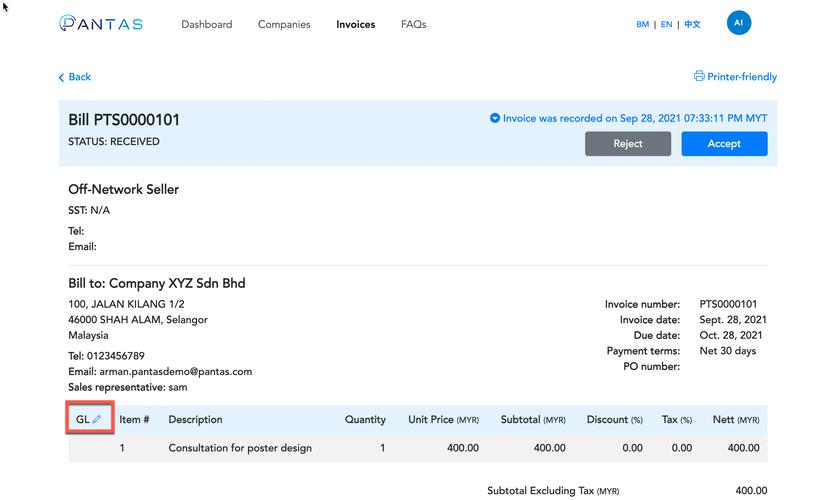
Next, click on the pencil icon next to “GL” code. Then you will see a dropdown box located underneath the "GL" column for each item in the invoice, as shown below:

Here, you can assign general code (GL) codes to individual invoice line items. Once you are done, click save!
To clone an invoice or a bill, simply go to “Invoices” on the top navigation bar to get to the page below.
Next, find any of the invoices or bills that you wish to clone and click "View".
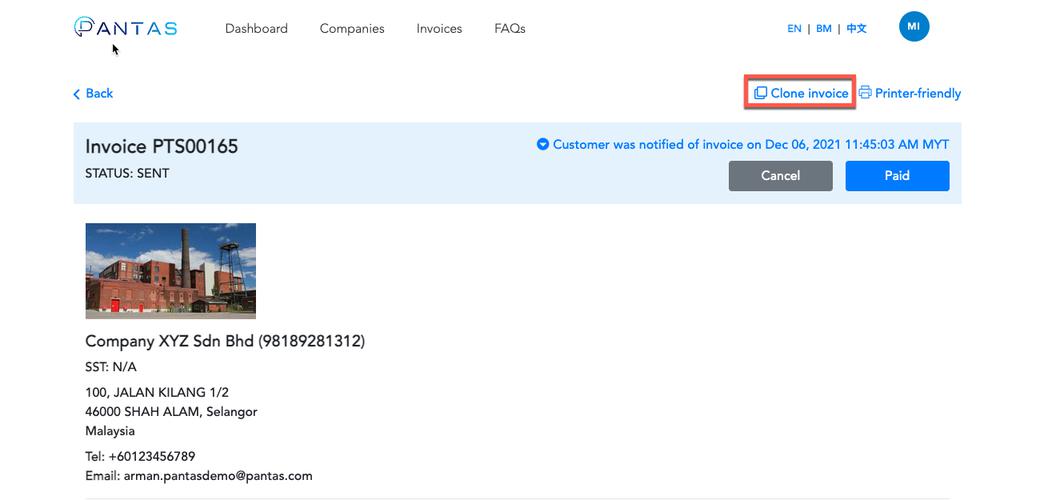
Here, find "Clone invoice" on the top right, click it to create an exact duplicate of the selected invoice or bill.
Once the cloned invoice/bill has been created, you may change the information based on your needs. You can then save it as a draft, send the invoice out to the recipient or record it if it's a bill.
Note:
The invoice number in the cloned invoice will be automatically generated and updated based on the latest running number sequence.
Do note that this only applies to our default numbering that starts with “PTS”, for example “PTS00012”, “PTS00013”, “PTS00014” etc.
Otherwise, kindly update the invoice number to your own latest number.
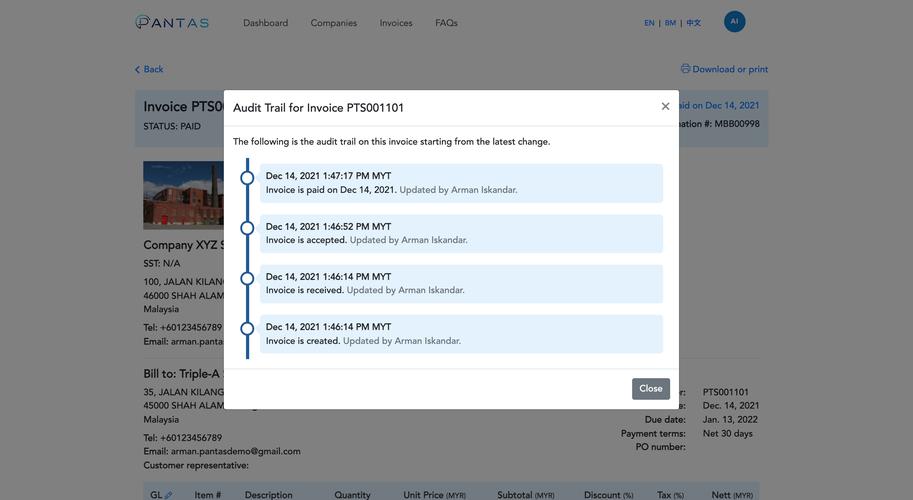
An audit trail is a record of the changes that have been made to an invoice or bill. It gives you visibility of all invoice transaction updates such as what action was taken, when it was taken, and by whom.
To check the audit trail of an invoice, simply go to the "Invoices" page to get to the page below.
Next, select any of the invoices or bills that you wish to view their audit trail of and click "View".
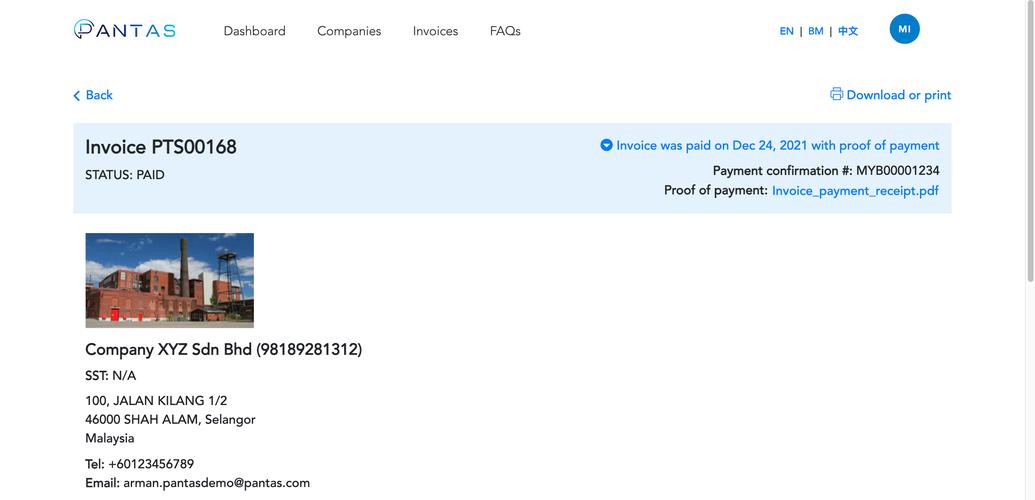
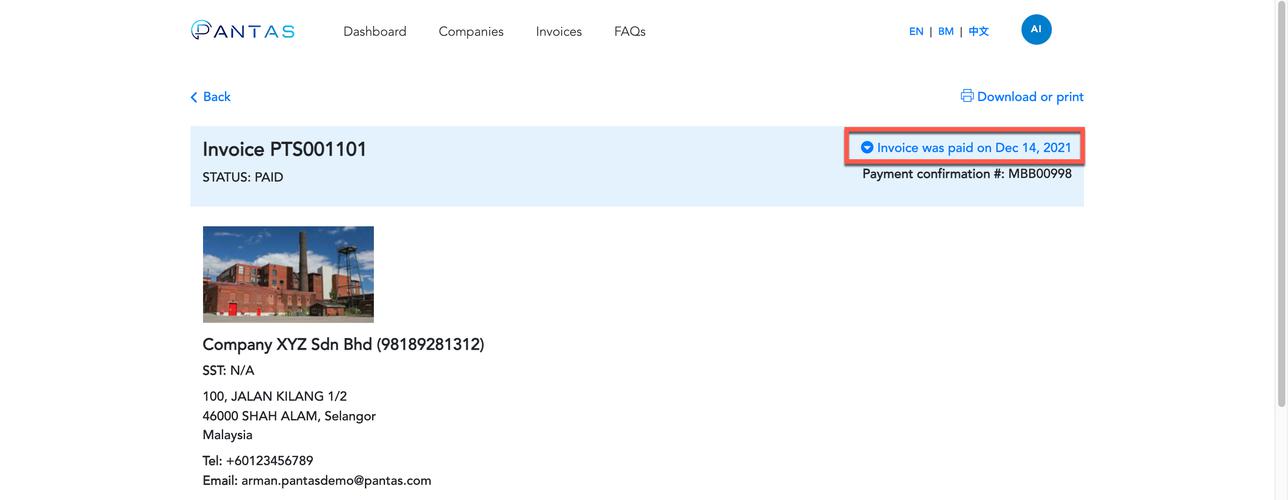
Here, as shown in the image below, find the blue text on the top right, click on it to view the audit trail.
Note that the blue text changes based on the last status update of that invoice, it would typically read “Customer was notified of invoice on….”, “Invoice was paid on…”, “Invoice was created on….” etc.
Here, you will see the pop-up that contains the audit trail.
To send a quotation, visit the ‘Invoices’ page. On the top left side of the page, find ‘Add an invoice’, click on it and fill in the relevant invoice details.
Once the invoice form is completed, press 'Preview' at the bottom of the page to proceed to the next page as shown below. Here, press 'Save as draft' to record the invoice on Pantas.
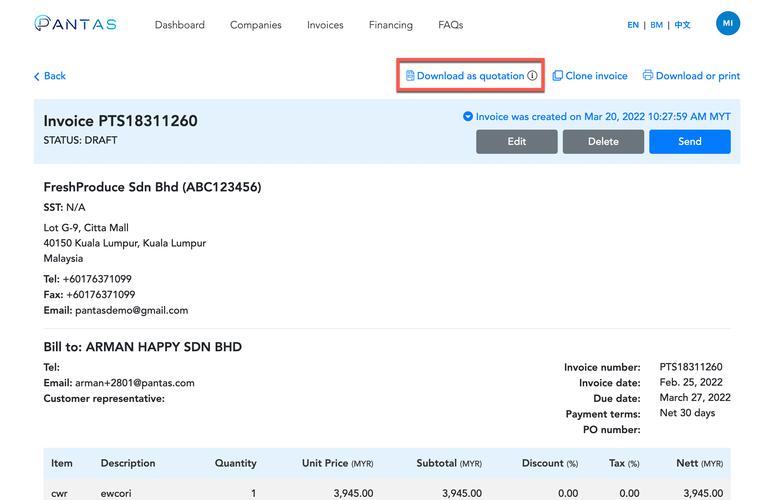
Then, view the draft invoice again and you will be able to see a button that says "Download as quotation" on the top right side of the page. The information keyed into the draft invoice will be used to populate the quotation document.
Press the "Download as quotation" button to generate the quotation document.
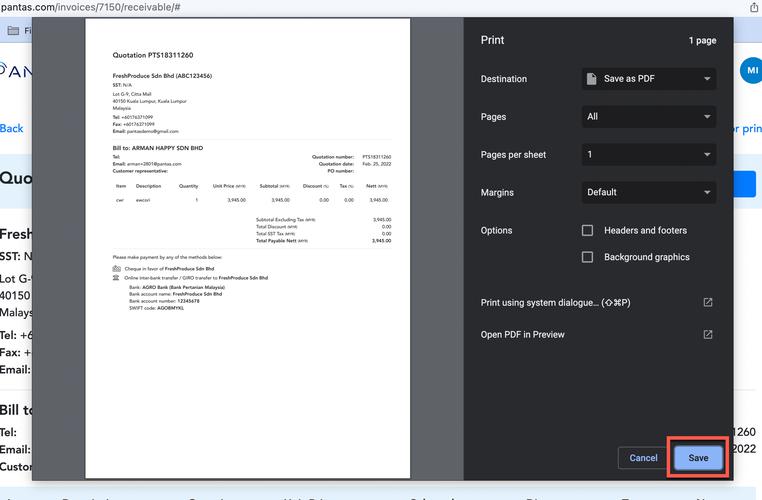
Here, press "Save" at the bottom right side of the pop up and the quotation document will be saved to your local device.
Note:
The "due date" and "payment terms" that exist in the invoice form will not be present on the quotation.
All invoices on Pantas goes through several status, as and when there are updates from either the seller or the buyer’s side to the invoice. Here's what they mean:
DRAFT - Draft invoices are editable, deletable, and have not been shared with the customer. Draft invoices can be downloaded as a quotation.
SENT/RECEIVED - Invoice is emailed and shared with the customer
WAITING - Invoice is emailed and shared with a non-Pantas user. Once signed up on Pantas, the recipient can access the invoice and other Pantas features.
ACCEPTED - Customer has acknowledged receipt of this invoice and has agreed to pay by the due date.
CANCELED - Seller has canceled this invoice and provided a reason for its cancellation. View the invoice to see the reason provided.
REJECTED - Customer has rejected this invoice and provided a reason for its rejection. View the invoice to see the reason provided.
PARTIALLY PAID - Customer has partially paid for this invoice.
PAID - Customer has fully paid this invoice.
DISPUTED - Seller has disputed the payment on this invoice and provided a reason. View the invoice to see the reason provided
5. Others
To change your password, please follow the below link:
https://invoice.pantas.com/accounts/password_change/
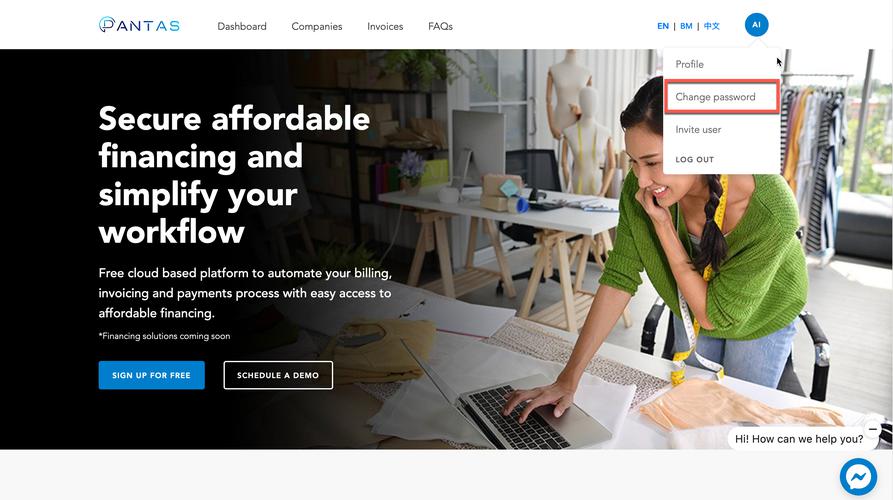
Alternatively, simply click the drop-down arrow on the right side of the navigation bar and click "Change password".
To reset your password, please follow the below link:
To invite a new user or a company, please follow the link below:
https://invoice.pantas.com/user/invite/
Alternatively, click on the profile icon on the top right corner to open a drop-down menu where you can then select "Invite user".
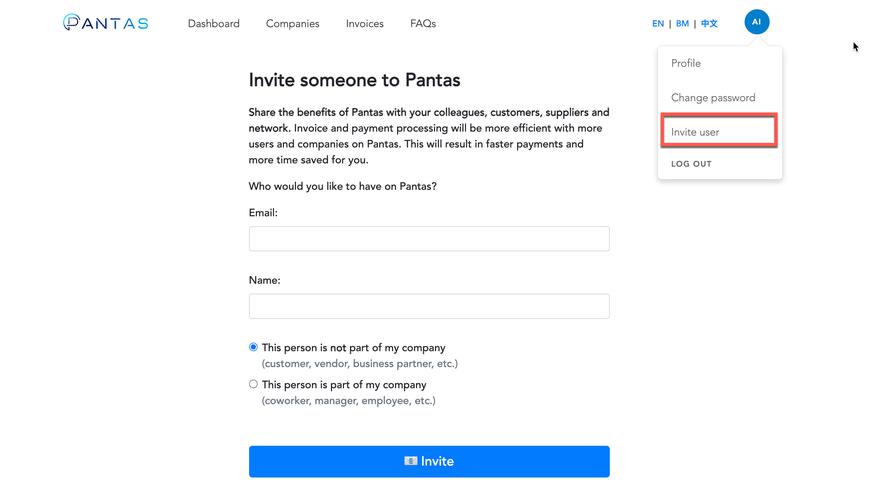
From here, fill in the relevant details and click "Invite".
Two-factor authentication (2FA) provides an extra layer of security to user accounts and significantly decreases the risk of unauthorized access and account breaches.
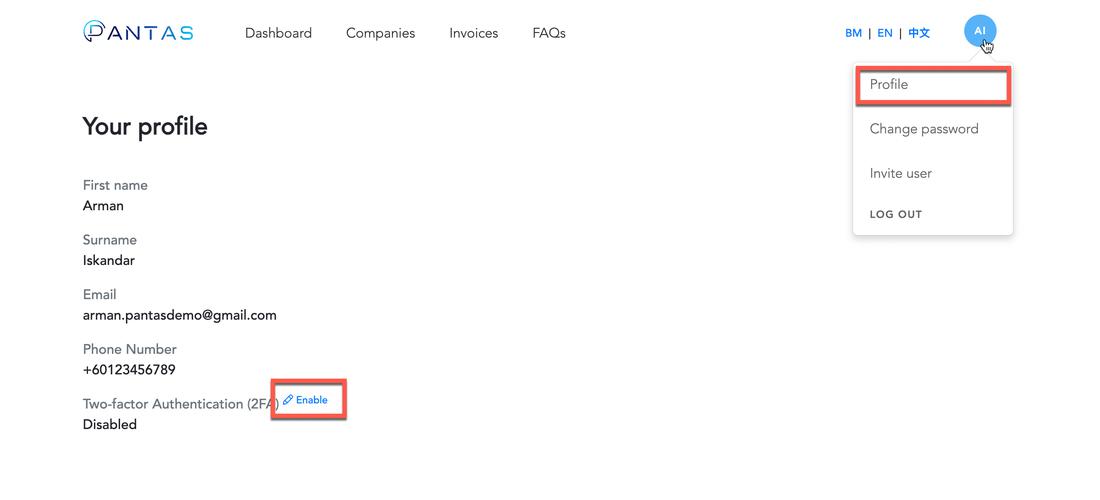
To enable two-factor authentication (2FA) for your account, simply click on "Profile" in the dropdown menu at the top right corner.
Then, click on "Enable" to set up two-factor authentication (2FA).
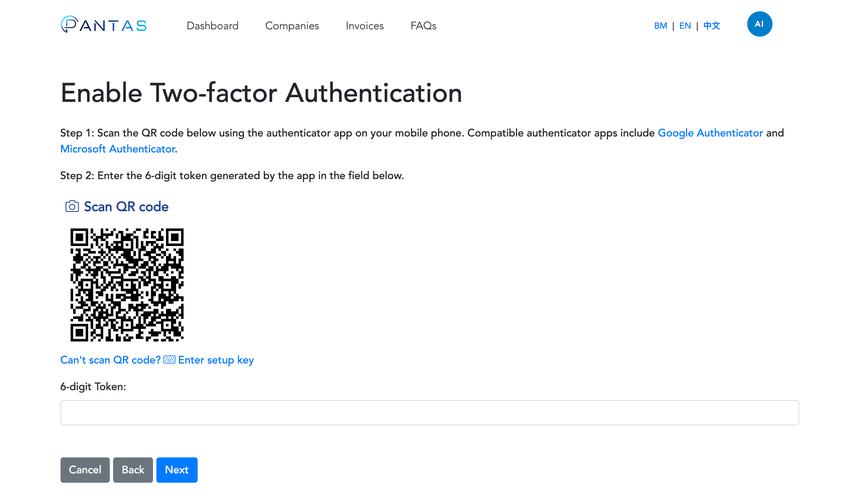
Once you are on the setup page shown below, scan the QR code on your screen with your mobile phone via an authenticator app of your choice. (Compatible authenticator apps include Google Authenticator and Microsoft Authenticator)
Lastly, enter the 6-digit token as shown on the app.
If you have any further questions or problems regarding MFA, feel free to contact us at info@pantas.com
There are multiple ways to send feedback and inquiries, read on to learn more.
- Feedback button on the right of the page
- Feedback tab in the footer
- Facebook live chat
- info@pantas.com
You can send user feedback or any other questions you might have to info@pantas.com or use the Facebook live chat button located at the bottom right corner of this page. We will get back to you as soon as possible!
Alternatively, a quicker way would be to share user feedback to us via our 'Feedback' tab located at the bottom of all our pages on the website. As shown in the image below:

You can also look for the Feedback button on the right side of the page. This button is only available on the “Homepage” and “FAQ” page. As shown in the image below:
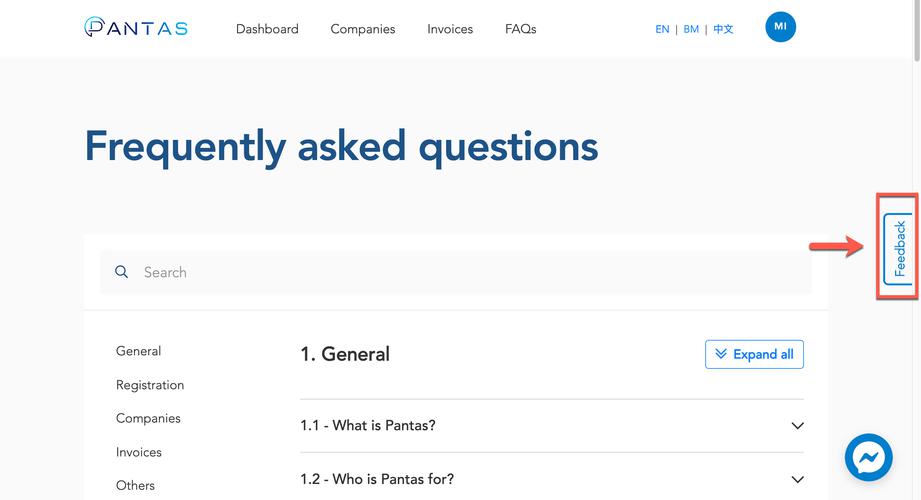
You will see a popup where you can rate your Pantas experience with the option to upload a screenshot of the relevant feature or page. Once done, insert your email and we will reach out to you to address your comments.

Yes, we do! Pantas will send payment reminders to both the Buyer and Seller of the invoice. Both parties will receive a reminder:
- Three (3) days before the due date,
- One (1) day after the due date, and
- Seven (7) days after the due date.